Ghoulishly Delicious: Crafting Realistic Mini Bleeding Heart Halloween Cakes (Vegan Options Included!)
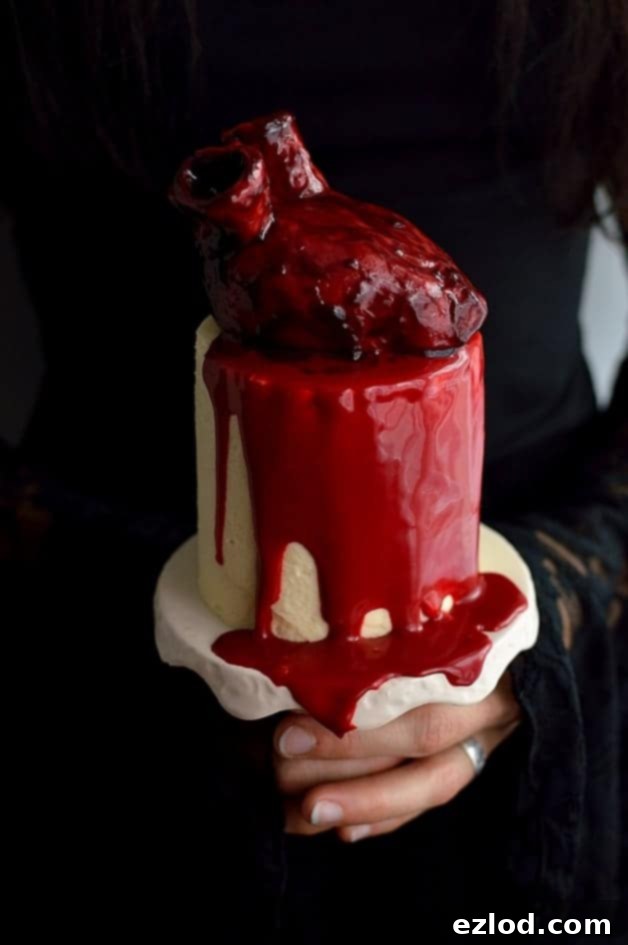
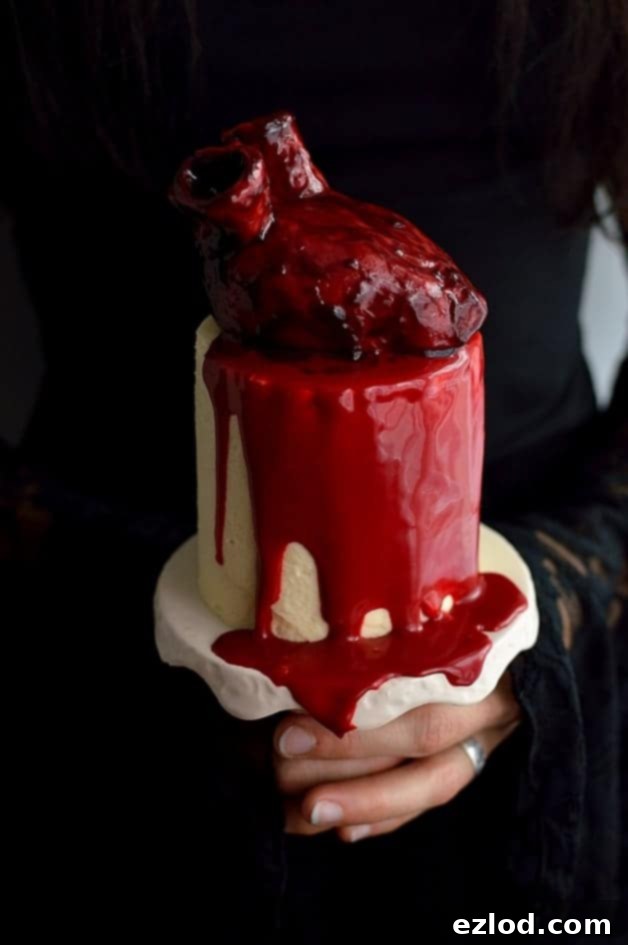
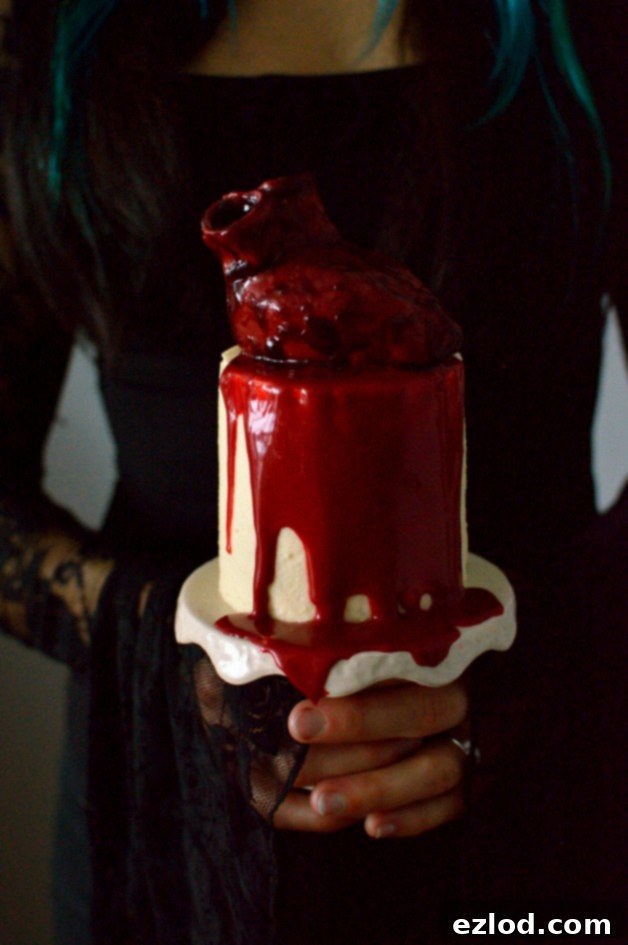
Prepare for an unforgettable Halloween treat that combines gruesome artistry with delectable flavor: these show-stopping Mini Bleeding Heart Halloween Cakes. Creating these spooky confections was an absolute blast, transforming my kitchen into a playful, albeit messy, craft studio. While my hands might still bear traces of vibrant food coloring, the joy and therapeutic satisfaction of bringing these creepy cakes to life made every colorful stain worthwhile. These aren’t just desserts; they’re conversation starters, guaranteed to impress and perhaps even slightly disturb your Halloween guests.
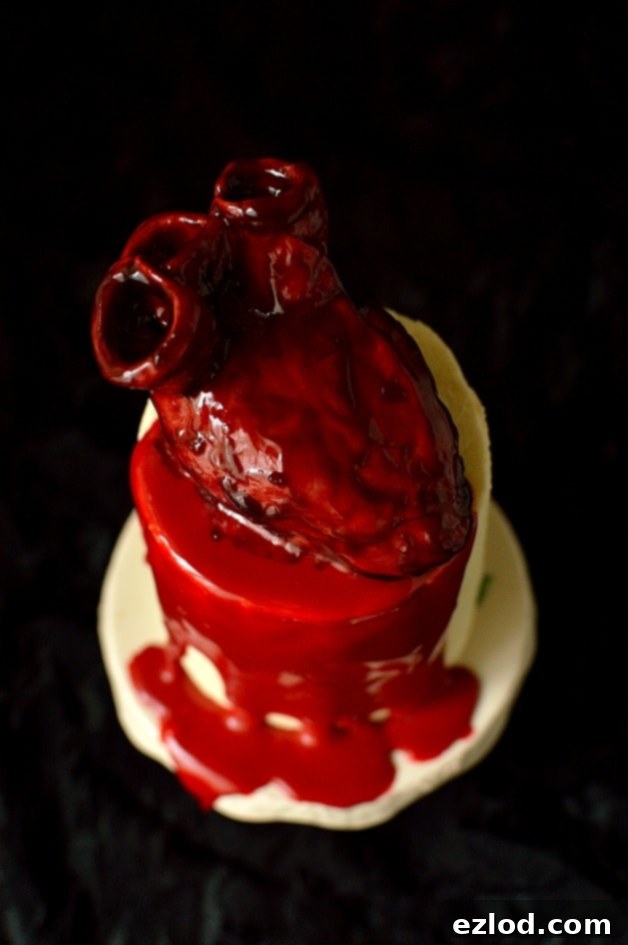
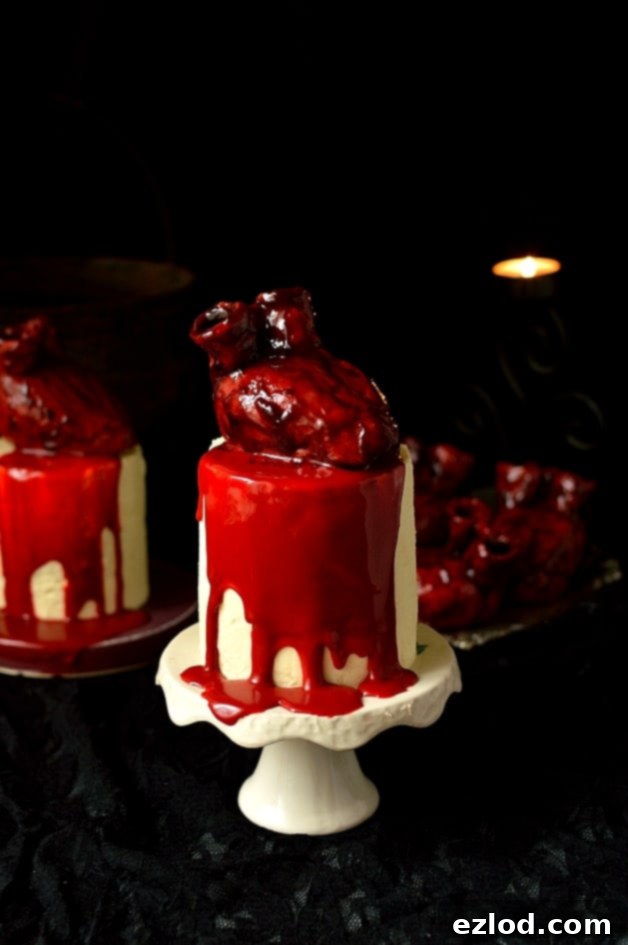
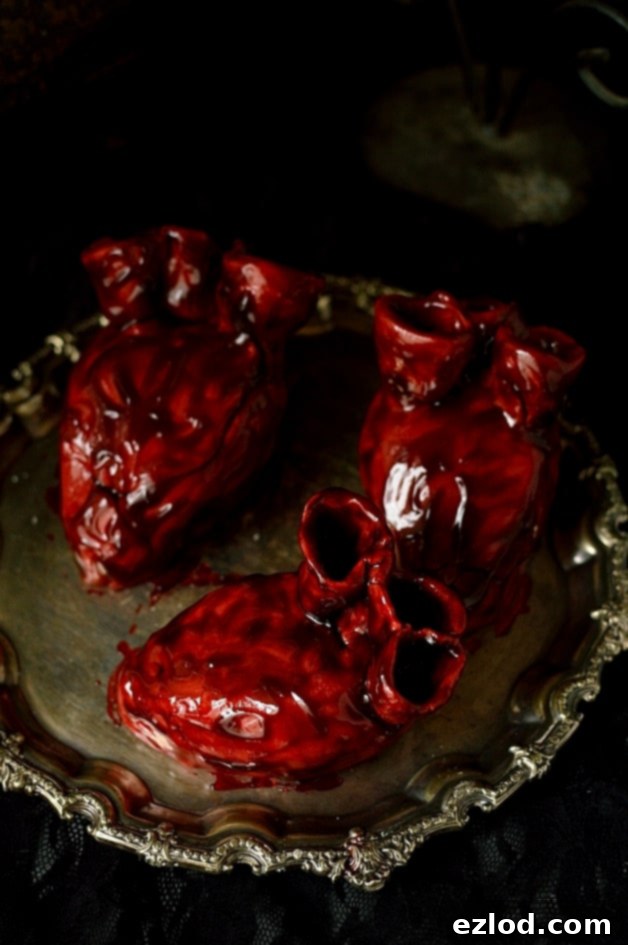
The concept of these captivating “bleeding hearts” originates from the brilliant mind of Lily Vanilli, an exceptionally talented baker and author. She initially conceived these hearts as an intriguing anti-Valentine’s cake, a dark twist on a traditionally romantic theme. Recognizing their immense potential for the spookiest night of the year, I adapted them into a truly impressive Halloween centerpiece. Imagine these realistic, gory hearts perched atop individual mini red velvet layer cakes, with streams of rich ganache ‘blood’ cascading dramatically down their sides. The visual impact is simply stunning and perfectly captures the eerie spirit of Halloween.
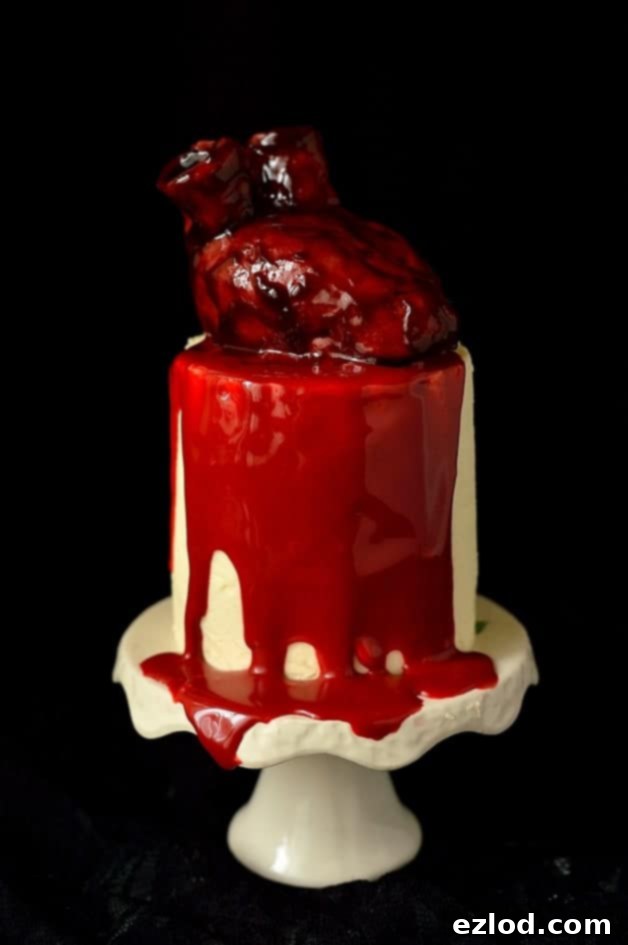
Despite their remarkably realistic and intricate appearance, these bleeding hearts are surprisingly straightforward to create, making them a fantastic, gruesome Halloween project to tackle with kids. While entirely edible, their primary purpose leans more towards dramatic decoration rather than a flavorful bite. Crafted primarily from fondant, their taste isn’t the star of the show. I recommend gently tearing them apart to reveal the delicious cakey innards beneath, which are truly a treat. Typically, I’m quite reluctant to use fondant for any of my bakes, preferring every element to be both edible and flavorful. However, for a theatrical and visually impactful creation like these bleeding heart cakes, I gladly make an exception.
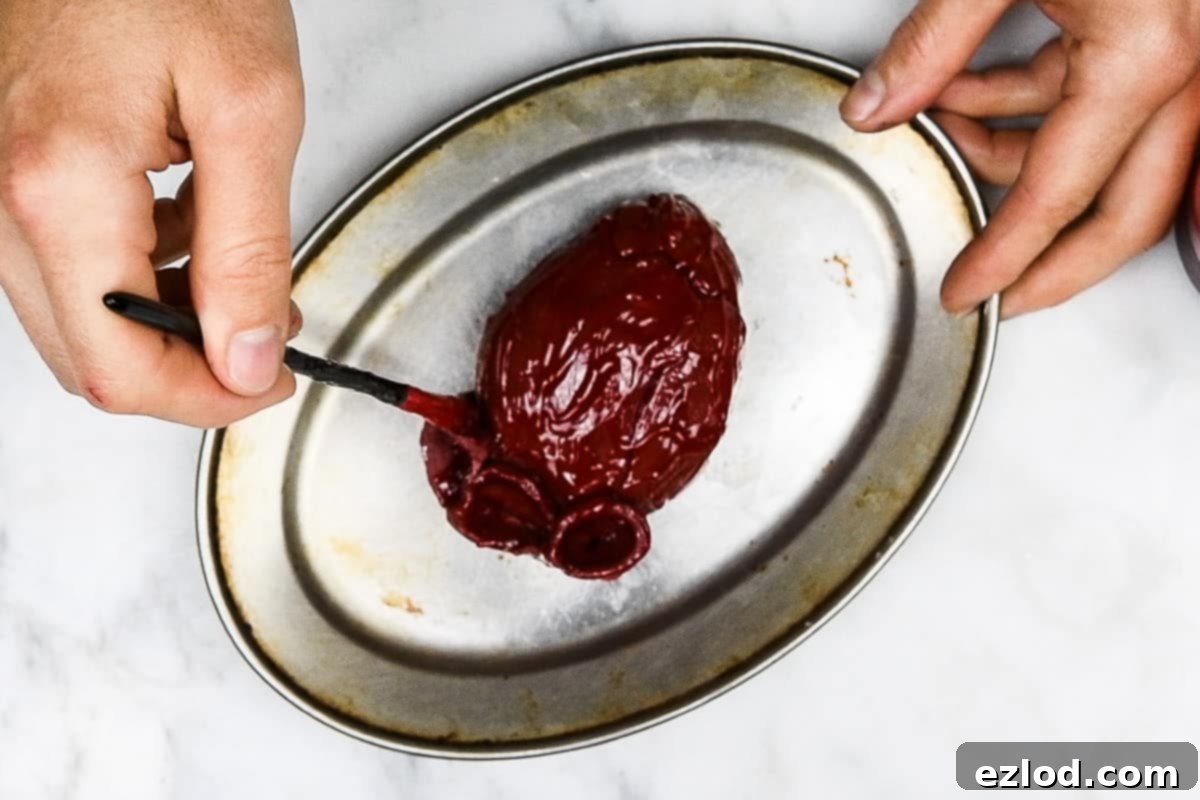
The hearts achieve their incredibly glossy and realistic shine from a generous coating of deeply tinted piping gel. This vibrant, blood-red gel gives them that unsettling, congealed blood appearance. While pre-made piping gel is available for purchase, crafting your own is incredibly quick, easy, and cost-effective – there’s really no need to seek it out. I’ve included a simple recipe for homemade piping gel further down in this article. To achieve the perfect gory shade for your Halloween treats, you’ll need high-quality gel (not liquid) food coloring in both vivid red and a touch of black. I highly recommend acquiring two pots of red food coloring, as it’s essential for coloring the red velvet cake, the piping gel, and the ganache ‘blood’. For consistent and intense color, Sugarflair in Christmas red is an excellent choice.
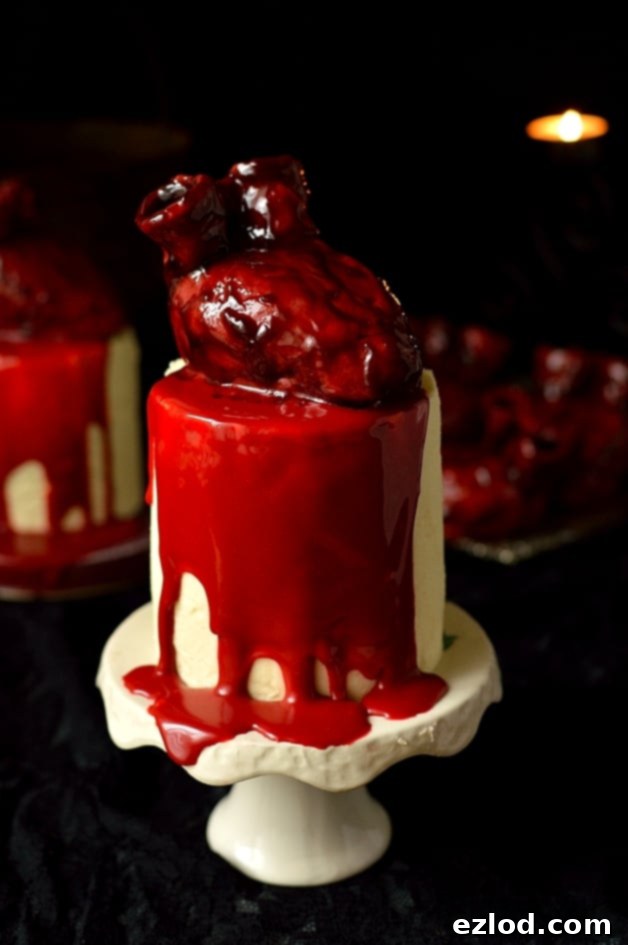
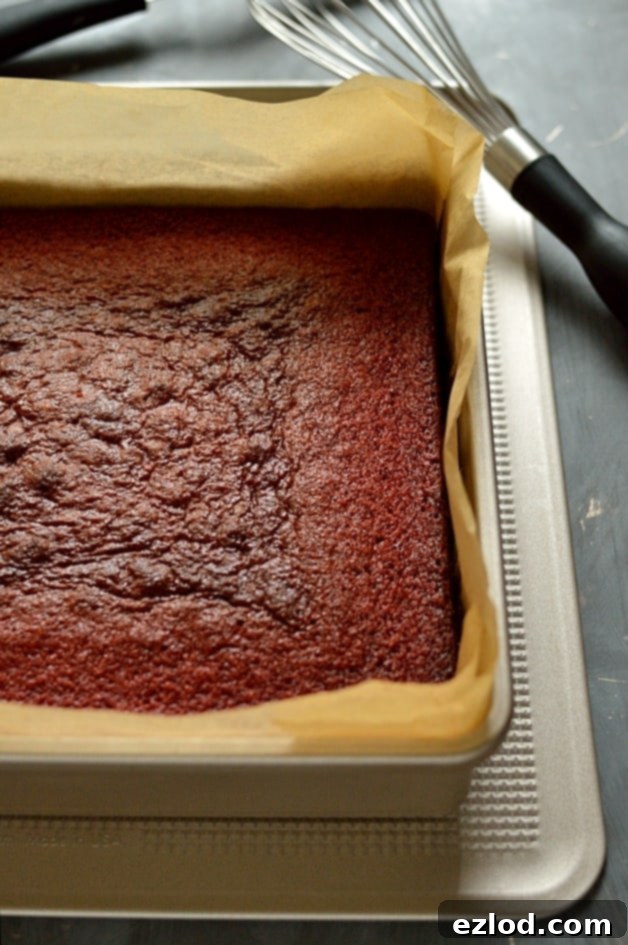
The foundation of these mini Halloween cakes is an exceptionally moist and flavorful red velvet cake. To streamline the baking process and avoid multiple batches, I used the same cake mix for both the base of the mini cakes and the cupcakes that form the core of the bleeding hearts. Red velvet cake, with its subtle cocoa notes and signature vibrant hue, provides a perfect contrast to the stark white frosting and dramatic red hearts. Given the delicate, soft texture of the baked cake, it’s best to prepare it the day before you plan to assemble your Halloween masterpieces. This allows the cake to firm up sufficiently, making it much easier to cut neat, precise circles for your mini layered creations. Similarly, the piping gel can also be prepared a day in advance and stored in an airtight container, ready for use. However, for the best results and structural integrity, assemble and paint the fondant hearts on the day you intend to serve them, as they can soften and lose their shape if made too far in advance.
Vegan Version: Crafting Spooky Treats for Everyone
Understanding the growing demand for inclusive dessert options, I’ve thoughtfully included comprehensive recipes for both traditional and a completely vegan version of these mini bleeding heart Halloween cakes. This ensures that everyone, regardless of dietary preferences, can enjoy these uniquely spooky and delicious treats. The beauty of this recipe lies in its adaptability: the piping gel and fondant are inherently vegan* in most cases, simplifying the adjustments needed. Therefore, only the recipes for the red velvet cake and the buttercream differ between the two versions, while the eye-catching assembly instructions remain identical for both. It’s important to note that while many fondants are vegan-friendly, always double-check the specific brands, as not all food colorings used in fondant production are plant-based. Brands like Renshaw fondants and Sugarflair food colorings are generally considered vegan-friendly, offering peace of mind for your plant-based Halloween baking.
Ermine Frosting: The Classic Red Velvet Pairing
To achieve the striking visual contrast essential for these bloody Halloween treats, the frosting needed to be pristine white. While cream cheese frosting is a classic and beloved pairing for red velvet cake, I opted for ermine, or cooked flour, frosting in this instance. Cream cheese frosting, while delicious, can be too soft, making it challenging to ice the mini cakes neatly and to withstand the moisture from the ganache and piping gel without weeping or losing structure. Ermine frosting, on the other hand, offers a lighter yet more stable consistency.
Ermine frosting is actually the traditional and original frosting for red velvet cake, predating the popular cream cheese version. Its preparation is somewhat unique: it begins with a roux made from milk and flour, cooked until it thickens into a pudding-like consistency. Once cooled, this mixture is then meticulously whisked into softened butter and fine caster sugar (not icing sugar). The result is an incredibly airy, fluffy, and subtly sweet buttercream that is exceptionally smooth, making it ideal for both spreading and intricate piping work. This elegant frosting not only provides the perfect white canvas but also offers a delightfully balanced flavor that complements the red velvet beautifully.
For the vegan adaptation of these Halloween cakes, I chose a standard American-style buttercream. This decision was based on its superior stability compared to a vegan ermine frosting, ensuring your spooky creations hold up well. To replicate the tangy notes often found in cream cheese frosting, a hint of cider vinegar and lemon juice is added. This subtle acidity works wonders with the rich red velvet cake, creating a harmonious flavor profile that is both familiar and exciting for plant-based palates.
How To Make Mini Bleeding Heart Halloween Cakes: Step-by-Step Guide
Embark on the thrilling journey of creating these captivating Mini Bleeding Heart Halloween Cakes. While these detailed instructions specifically highlight the vegan version, rest assured that the assembly steps for both the traditional and vegan cakes remain precisely the same, ensuring a seamless crafting experience for everyone. Precision in baking is key, so pay close attention to the measurements and techniques described.
(For a comprehensive list of ingredients and detailed, full instructions, please refer to the recipe card provided below.)
*For truly exceptional results, meticulously follow the recipe. As always, I cannot stress enough the importance of using gram measurements with a digital scale rather than relying on cup conversions. Cup measurements are simply not accurate enough for successful baking, and I cannot guarantee the best outcomes if you choose to use them.*
To ensure optimal freshness and ease of assembly, prepare your cakes and piping gel the day before you plan to bring your bleeding heart creations to life. This allows the cakes to set and cool completely, making them easier to handle, and the piping gel to develop its perfect consistency and color.
Vegan Red Velvet Cakes: The Heart of Your Spooky Dessert
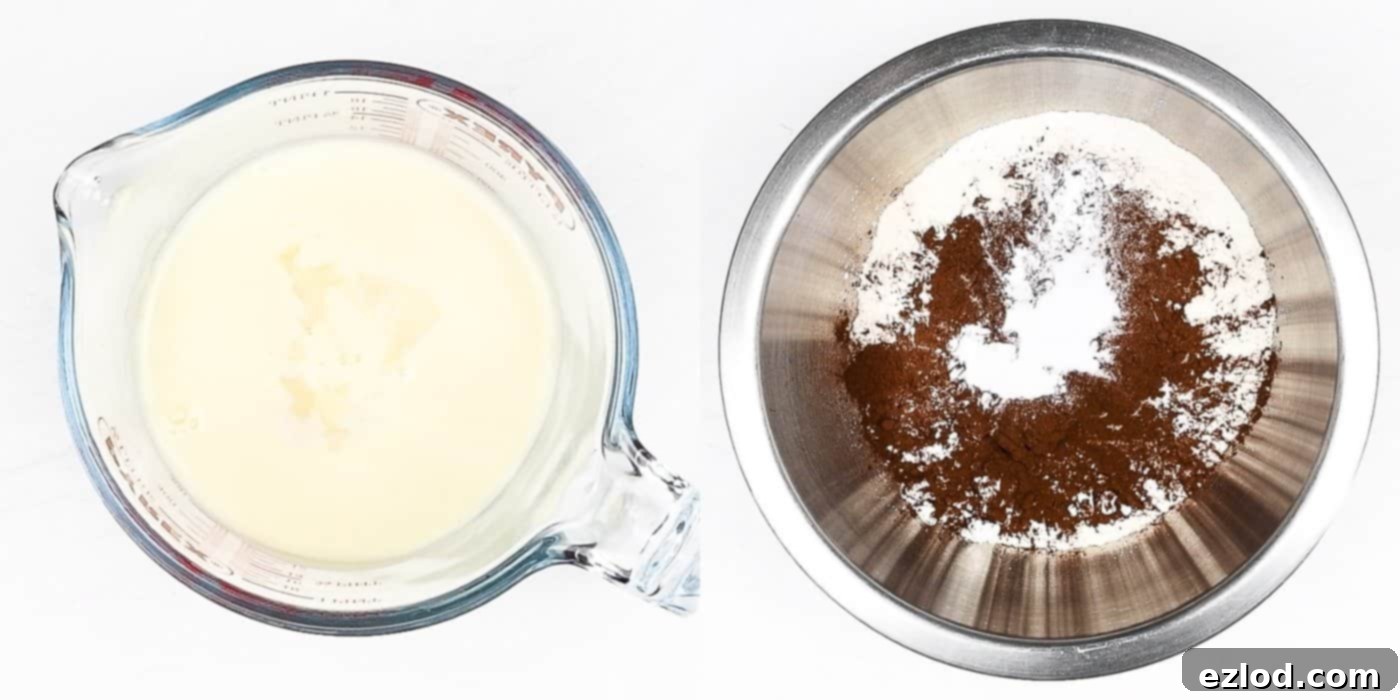
Begin by preparing the vibrant vegan red velvet cake. In a medium-sized jug, whisk together the non-dairy yogurt (soy yogurt is highly recommended for its texture and mild flavor), non-dairy milk (again, soy milk yields excellent results), white wine or cider vinegar, and vanilla extract until thoroughly combined and smooth. This wet mixture will be crucial for the cake’s tender crumb and flavor.
Next, in a separate large bowl, meticulously sift together the dry ingredients: plain flour, cornflour (cornstarch), rich cocoa powder, baking powder, bicarbonate of soda (baking soda), and a pinch of salt. Sifting ensures an even distribution of leavening agents and a lighter cake texture.
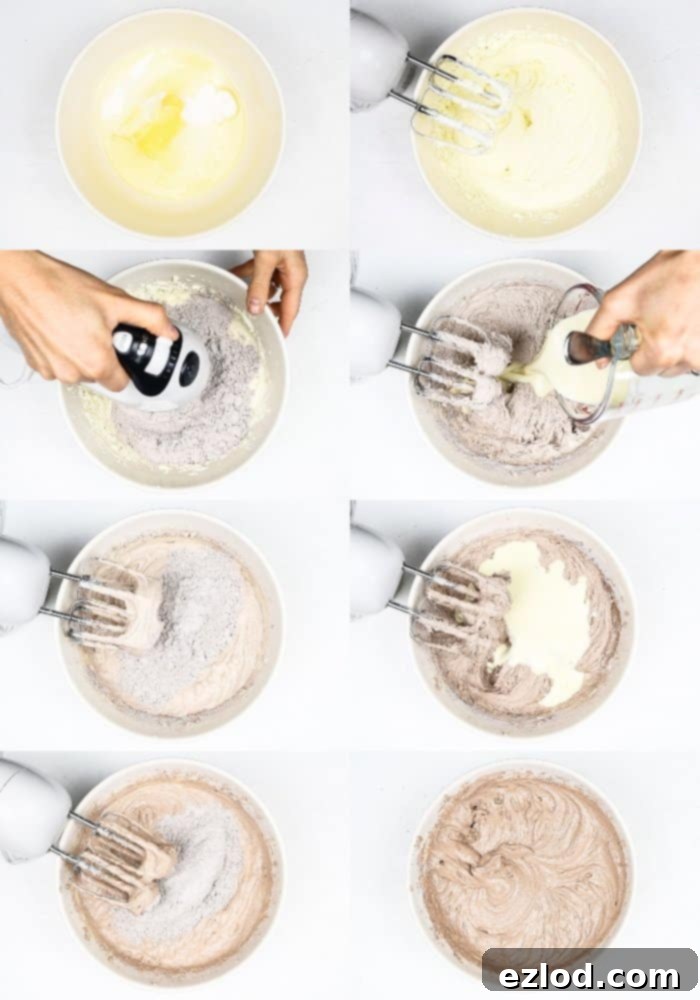
In a separate large mixing bowl, the foundation of your moist cake begins. Combine the softened vegan block butter (crucially, use a solid block butter like Naturli Vegan Block, not the spreadable tub variety), sunflower oil, and caster sugar. Beat these ingredients together with an electric mixer until the mixture becomes wonderfully light, fluffy, and visibly pale. This step incorporates air, contributing to the cake’s tender structure.
Now, it’s time to combine the wet and dry ingredients. Gradually whisk in a third of the sifted dry ingredients into the butter mixture, followed by half of the prepared wet ingredients. Continue this pattern: whisk in another third of the dry ingredients, then the remaining wet ingredients, and finally, the last third of the dry ingredients. Mix until just combined, being careful not to overmix, which can lead to a tough cake.
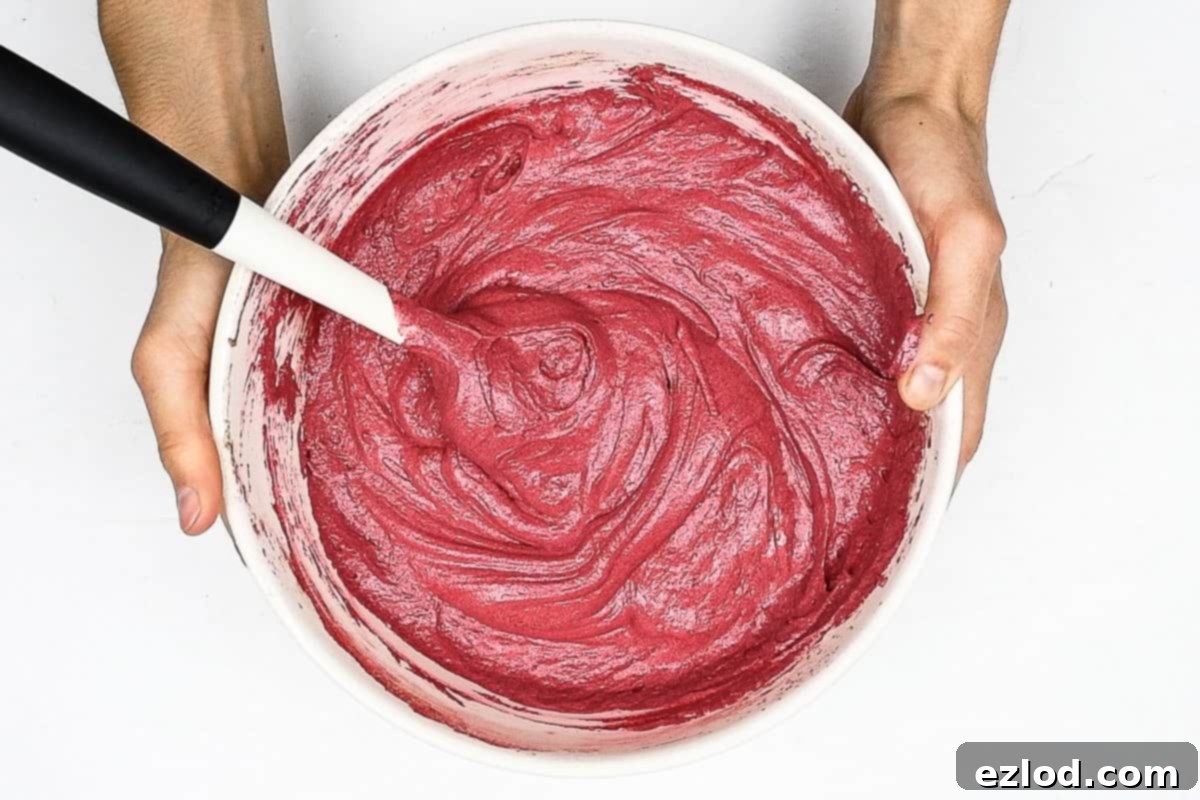
To achieve the signature red velvet hue, gently stir in the red gel food coloring. Add it a little at a time, mixing until the batter reaches your desired shade. Remember, the color will deepen somewhat during baking, so aim for a slightly lighter shade than your final desired outcome. A vibrant, deep red is perfect for these spooky Halloween cakes.
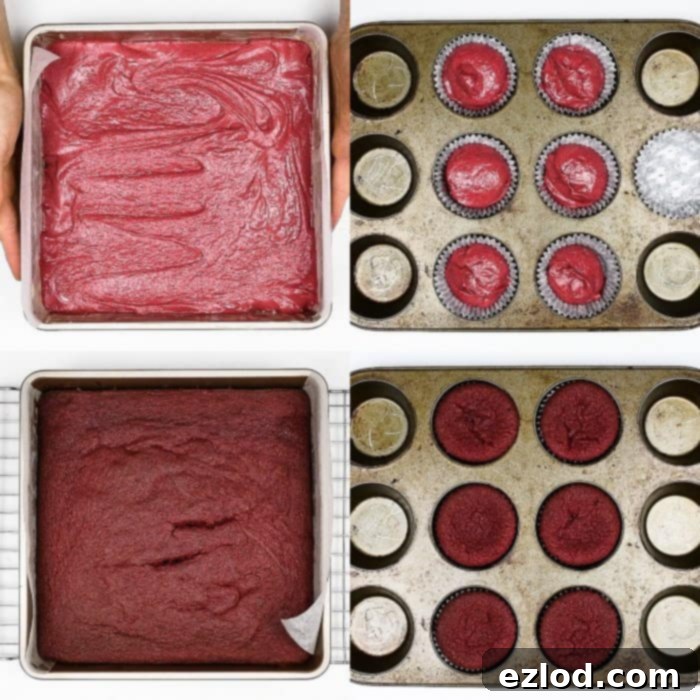
Pour approximately three-quarters of the brilliantly colored batter into a greased and parchment-lined 23cm/9-inch square cake tin. Spread the batter evenly. Divide the remaining batter among 6-7 cupcake cases placed in a muffin tin. These cupcakes will form the edible core of your bleeding hearts.
Bake the cakes in your preheated oven until a skewer inserted into the center emerges clean, indicating they are fully cooked. This will typically take about 20 minutes for the cupcakes and around 30 minutes for the larger square cake. Once baked, carefully remove them from the oven and allow them to cool completely within their tins. Cooling in the tin prevents cracking and ensures the cakes retain their moisture and structure.
Piping Gel: The “Blood” That Brings It All to Life
Vegan Buttercream: The Fluffy White Contrast
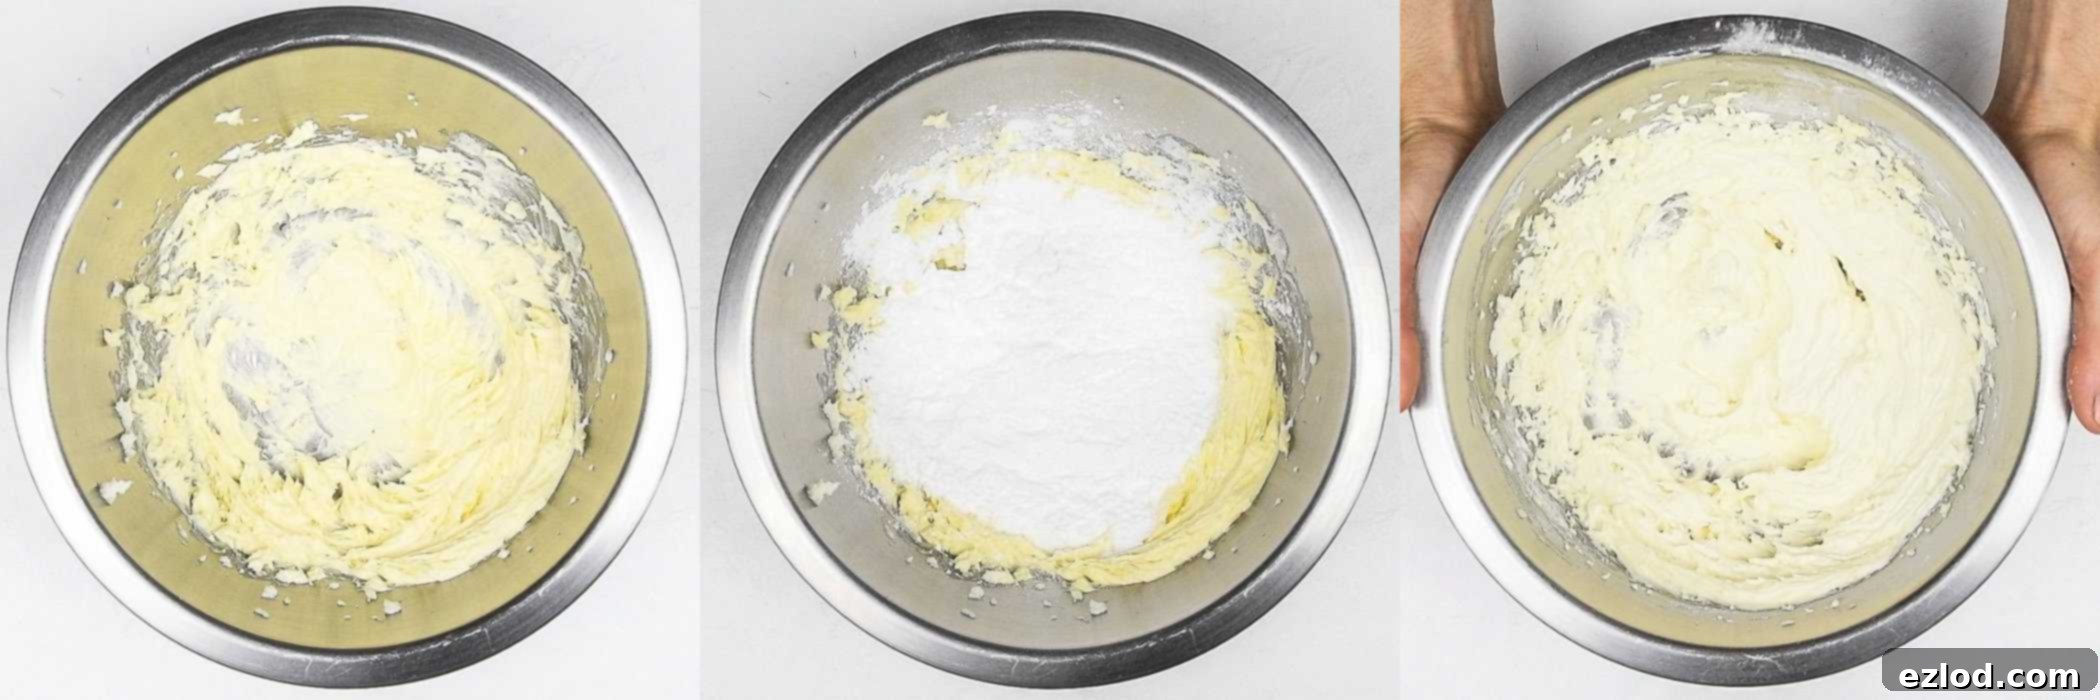
For the stable and delicious vegan buttercream, combine the vegetable shortening (Trex is a good option) and the softened vegan block butter (again, ensuring it’s the solid block variety, not spreadable tub butter like Naturli Vegan Block) in a large mixing bowl. Using an electric mixer, whisk these two fats together until they are perfectly smooth and homogenous. This creates a creamy base for your frosting.
Next, add the sifted icing (powdered) sugar to the bowl. Sifting is crucial here to prevent lumps and ensure a silky-smooth buttercream. Incorporate the cider vinegar, lemon juice, and vanilla extract. Whisk all the ingredients together on a high speed for a good few minutes – at least 5-7 minutes. This extended whipping time is vital for incorporating sufficient air, transforming the mixture into a wonderfully light, fluffy, and spreadable buttercream that will coat your mini cakes beautifully.
Assembly: Bringing Your Bleeding Heart Cakes to Life
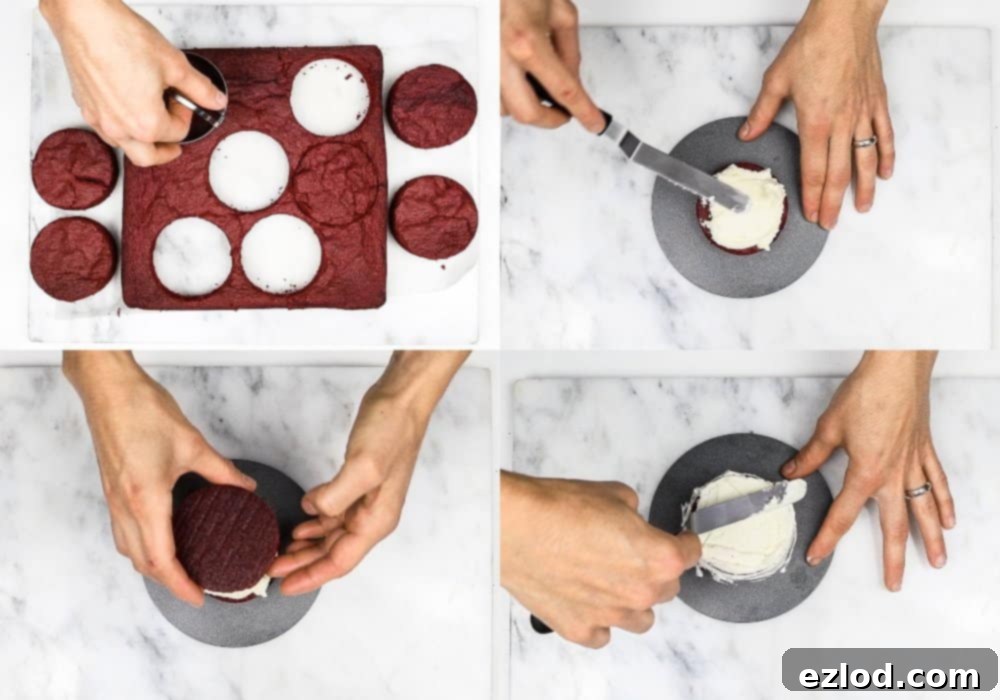
Begin the assembly process by carefully turning the large red velvet cake out of its tin and peeling off the baking parchment. If needed, trim the top of the cake to create a perfectly level surface. Using an 8cm (3-inch) round cookie cutter, cut out as many circles as possible from the large cake. You will need a total of six cake circles to construct three mini layered cakes.
Ganache: The Final Bloody Touch
To create the rich, flowing ‘blood’ ganache, place your dairy-free white chocolate (finely chopped for easier melting) and coconut cream in a heatproof bowl. Gently microwave the mixture in very short bursts (15-20 seconds at a time), stirring thoroughly after each interval, until the chocolate is completely melted and the mixture is smooth and glossy. Alternatively, you can place the bowl over a pan of gently simmering water, ensuring the base of the bowl does not touch the water, and stir until melted and smooth.
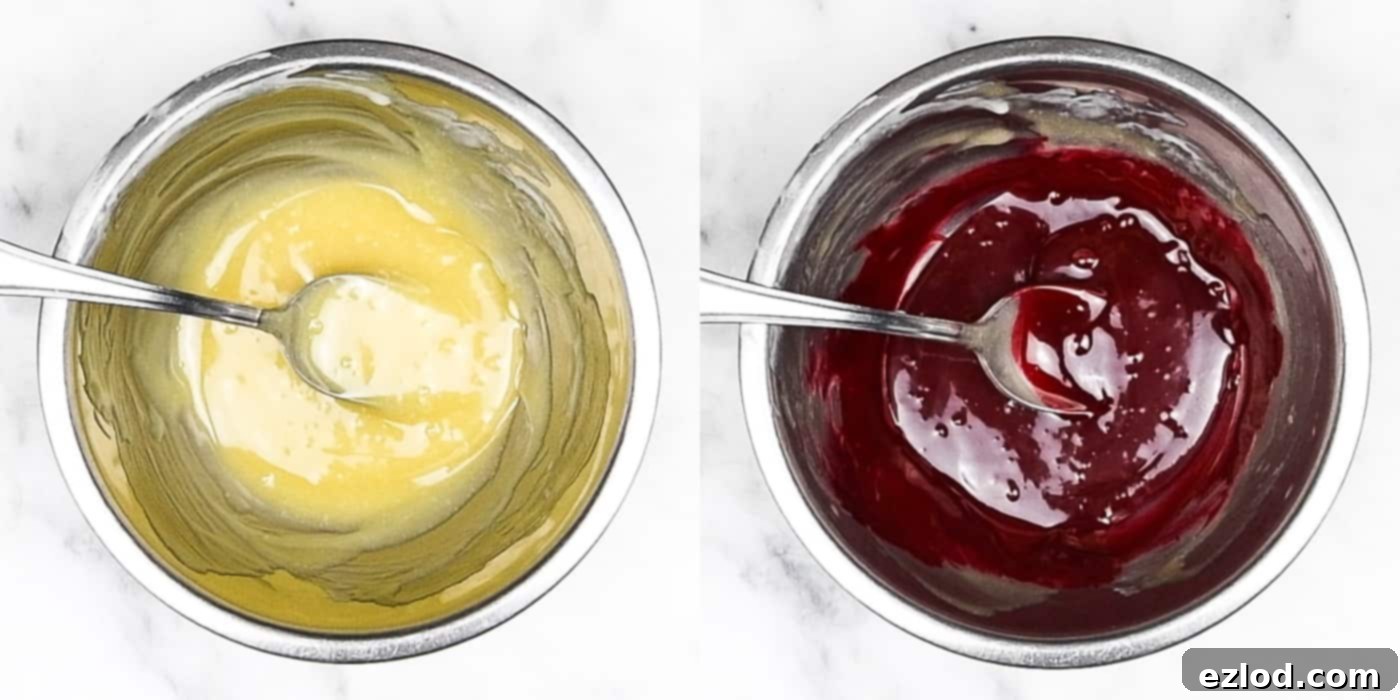
Once melted, add red food coloring, a little at a time, mixing well until the ganache reaches a deep, ominous blood-red shade. If you desire a darker, more realistic hue, incorporate a tiny touch of black food coloring. Set the ganache aside to cool and thicken slightly. It should still be pourable but have enough body to slowly cascade down the sides of the cakes, creating that dramatic bleeding effect.
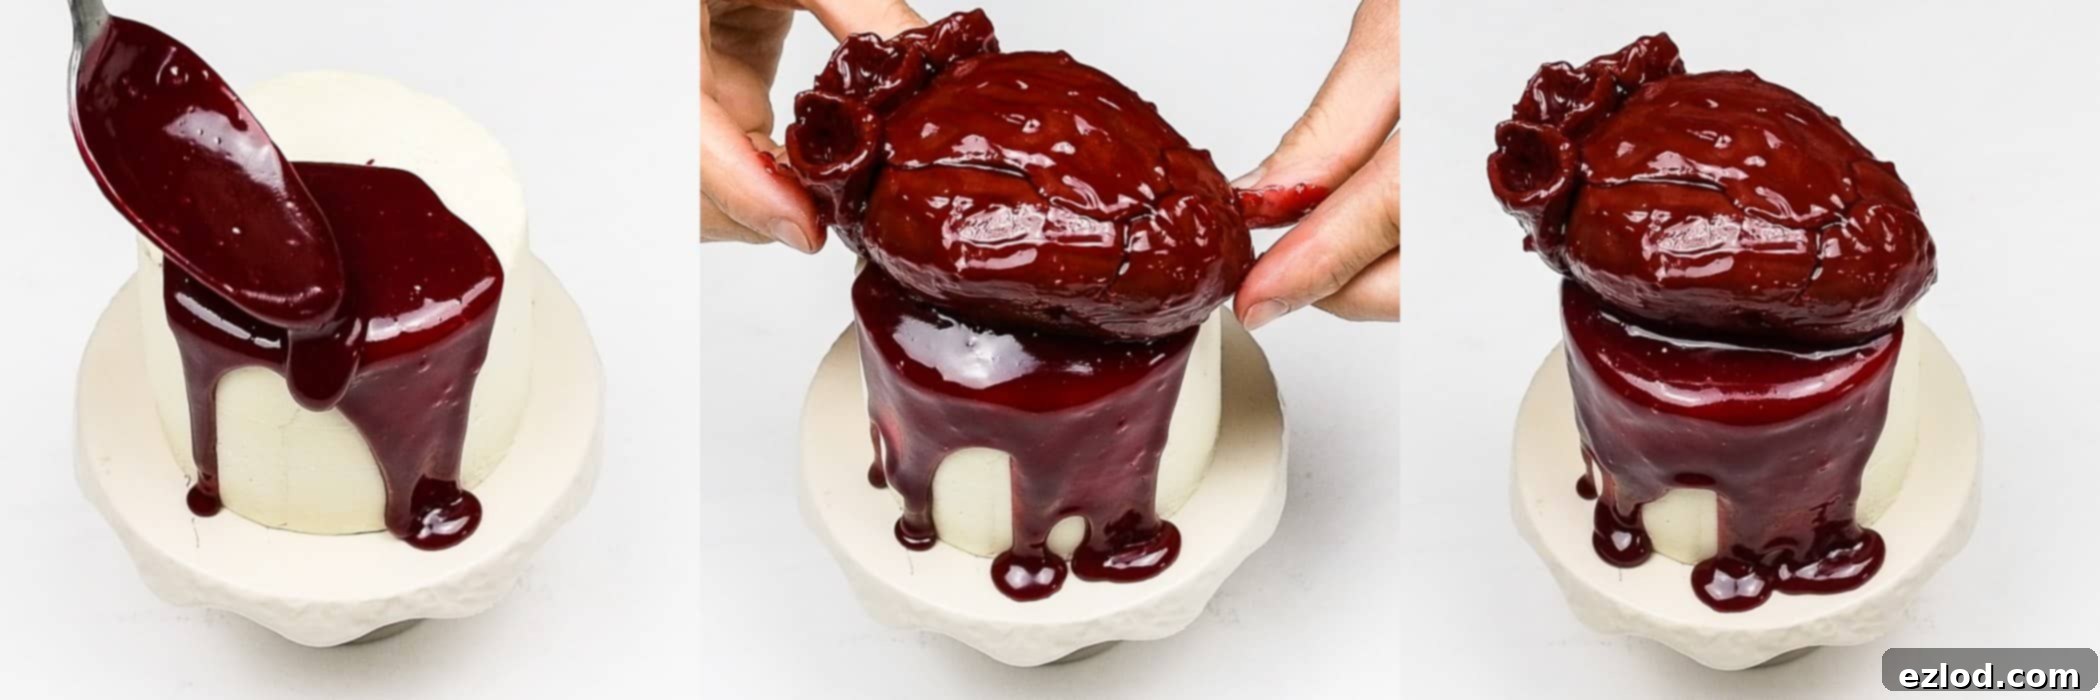
For the grand finale, retrieve your perfectly chilled cakes from the fridge or freezer. Take the thickened ganache and, with a steady hand, artfully drizzle a generous amount over one side of each cake. If the ganache has thickened too much to flow freely, give it a very short burst in the microwave to bring it back to a pourable consistency. Immediately after drizzling, carefully place one of your dramatic bleeding hearts on top of each mini cake. The contrast of the white buttercream, red cake, and glossy, bloody heart is simply stunning. Serve these ghoulishly delightful mini bleeding heart Halloween cakes immediately to maximize their visual impact and freshness. If any heart refuses to stay perfectly in place, a discrete toothpick can be used to secure it to the cake.
Top Tips for Perfect Bleeding Heart Cakes:
- **Timing is Everything:** To prevent the fondant hearts from absorbing moisture and becoming soft, do not paint them with the piping gel or fully assemble the mini cakes until shortly before you plan to serve them. This ensures their dramatic impact is maintained.
- **Prepare Ahead:** For a less stressful baking day, feel free to bake the red velvet cakes and prepare the piping gel a day or two in advance. Store the cooled cakes in an airtight container at room temperature and the piping gel in an airtight container in the fridge.
- **Heart Storage:** Once the fondant hearts are shaped (but crucially, *before* they are painted with piping gel), they can be stored in an airtight container at room temperature for up to two days.
- **Cake Frosting:** The mini cakes can be filled and coated with their buttercream crumb coat and final layer a day in advance. Store them carefully in the fridge until you’re ready for the final ganache and heart placement.
- **Coloring Essentials:** Ensure you have high-quality gel food coloring in both vibrant red and a small amount of black. Brands like Sugarflair are excellent for achieving intense, consistent colors vital for the realistic ‘blood’ effect.
- **Repurpose Cake Scraps:** Don’t let those cake trimmings go to waste! They can be frozen for up to two months and creatively repurposed in a trifle, or mixed with frosting to make some delightfully spooky Halloween cake pops.
- **Accurate Measurements:** For the best and most consistent baking results, always use gram measurements with a digital scale. Cup conversions are less precise and can lead to variations in texture and outcome.
Berry Coulis: An Extra Layer of Bloody Flavor
For an additional layer of fruity flavor and an even more dramatic ‘blood’ effect, I highly recommend serving these mini bleeding heart Halloween cakes with a homemade berry coulis. Not only does it taste incredible, but its deep red hue provides an extra visual punch, making it look strikingly like fresh blood pooling around your spooky creations.
To prepare this simple yet impactful coulis, combine 250g of mixed frozen berries (such as raspberries, strawberries, and blackberries), 60g of caster sugar, and 60ml of water in a saucepan. Simmer the mixture gently over medium heat until the berries have softened and the liquid has thickened slightly. Once cooked, purée the mixture using an immersion blender or a regular blender, then press it through a fine-mesh sieve to remove any seeds, resulting in a perfectly smooth, rich coulis.
Remember this crucial tip: only pour the berry coulis onto your plates just before serving. The moisture from the coulis can cause the delicate fondant hearts to soften and potentially melt if left in contact for too long, compromising their eerie perfection.
MORE HALLOWEEN RECIPES TO EXPLORE:
- Vegan tombstone cupcakes
- Mini pentagram topped vegan apple pies
- Witches’ finger cookies
- Chocolate glazed black cat doughnuts
- Halloween haunted pavlova
- Chocolate blackberry gothic Halloween cake
- Meringue bone palace Halloween cake
- Jack-O-Lantern pumpkin pies
- Monochrome cake
Video Instructions: Visualize the Craft
When it comes to the intricate process of assembling the realistic fondant hearts, a visual guide can be incredibly helpful. It’s often easier to watch the technique being demonstrated than to try and visualize it from written instructions alone. For this reason, I’ve conveniently linked to an excellent video featuring Lily Vanilli herself, the original creator of these hearts. This video clearly illustrates all the necessary steps for shaping the hearts. I highly recommend watching it through entirely before you begin your own crafting process, as it will provide invaluable insight and confidence.
If you dare to try this recipe, why not share your ghoulish creations? Tag @domestic_gothess on Instagram and use the hashtag #domesticgothess to join our spooky baking community!
*All images and content on Domestic Gothess are copyright protected. If you wish to share this recipe, please do so by utilizing the provided share buttons. Please do not screenshot, copy, or post the recipe or content in its entirety without permission.*
Mini Bleeding Heart Halloween Cakes Recipe (Regular Version):
(See below for the Vegan Version recipe card)

Mini Bleeding Heart Halloween Cakes
Ingredients
Cakes:
- 300 g (2 + ½ cups) plain flour
- 45 g (generous ⅓ cup) cornflour (cornstarch)
- 1 tsp bicarbonate of soda (baking soda)
- 2 tbsp cocoa powder
- ½ tsp salt
- 150 g (½cup + 2tbsp) softened butter
- 400 g (scant 2 cups) caster sugar
- 100 ml (⅓ cup+1tbsp+1tsp) vegetable oil
- 4 large eggs separated
- ½ tbsp vanilla extract
- 1 tsp white wine or cider vinegar
- 240 ml (1 cup) buttermilk
- 2 tsp red gel food colouring (approx)
Piping Gel:
- 70 g (⅓ cup) caster sugar
- 1 tbsp cornflour (cornstarch)
- 60 ml (¼ cup) water
- 60 ml (¼ cup, about 2 medium) lemon juice
- red and black gel food colouring
Buttercream:
- 300 ml (1 + ¼ cups) full fat milk
- 6 tbsp plain flour
- 260 g (1 cup + 2tbsp) softened butter
- 260 g (1 + ¼ cups) caster sugar
- 2 tsp vanilla extract
- pinch salt
Ganache:
- 60 g (2 oz) white chocolate chopped
- 40 ml (scant 3 tbsp) double (heavy) cream
- red and black gel food colouring
Hearts:
- about 750g (26oz) red fondant
- about 60g (2oz) black fondant
Instructions
Cakes:
-
Bake the cakes the day before you want to assemble them. Preheat the oven to 180C/350F/gas mark 4. Grease a 23cm/9in square tin and line with baking parchment. Line a muffin tin with fairy cake/small cupcake cases.
-
Sift together the flour, cornflour, bicarbonate of soda, cocoa powder and salt, set aside. Using an electric mixer, whisk together the butter and sugar until well combined. Whisk in the oil a little at a time, whisking well after each addition. Whisk in the egg yolks, vanilla extract and vinegar, beating until well combined.
-
With the mixture on a low speed, fold in one third of the flour mixture, followed by half the buttermilk, then another third of flour, the remaining buttermilk then the remaining flour.
-
Add red gel food colouring a little at a time until you reach the desired shade, bear in mind that the colour will darken a fair bit when the cakes are baked so you don’t need to get it as dark as you want it to be.
-
In a clean bowl, vigorously whisk the egg whites with a balloon whisk until good and frothy but not yet beginning to stiffen then fold them into the cake batter.
-
Pour about three quarters of the mixture into the square tin then divide the remainder among the cupcake cases, I made five fairy cakes and three cupcakes.
-
Place the square tin on the lower middle oven shelf and the cupcake tray on the upper middle one. Bake the cupcakes for about 15 minutes, until a skewer inserted into the centre comes out clean; remove the cupcakes from the oven and transfer to a wire rack to cool. The large cake will take about 45 minutes to 1 hour to cook, cover loosely with foil towards the end of baking if the top starts to brown too much.
-
Place the tin on a wire rack and leave the cake to cool in the tin. Once cooled, store the cake and cupcakes in an airtight container.
Piping Gel:
-
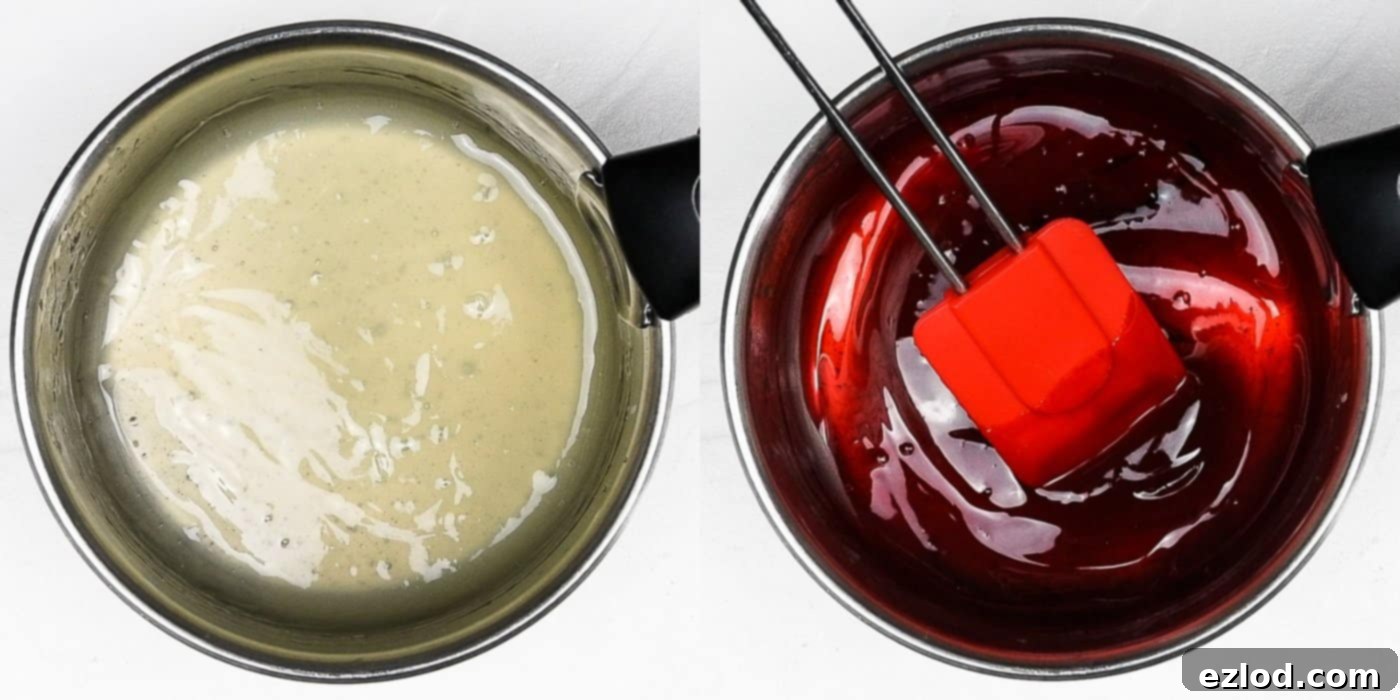
Place the cornflour in a small saucepan and gradually stir in the water to make a smooth paste, add the sugar and lemon juice. Whisk until smooth then place over a medium heat and whisk constantly until the mixture comes to the boil and thickens; it should go from being white coloured to almost translucent. Scrape into a bowl, cover and leave to cool.
-
Once cooled, add red gel food colouring, along with a teeny bit of black, a little at a time until the gel is a deep, dark blood-red colour. Store in an airtight container.
Buttercream:
-
Place the flour in a saucepan, whisk in the milk a little at a time until it is all combined. Place the pan over a medium-high heat and whisk constantly until it thickens to a very thick pudding-like consistency. Scrape into a bowl, cover with clingfilm directly on the surface and refrigerate until cooled.
-
Whisk together the butter and sugar with an electric mixer on high speed for at least five minutes until very light and fluffy. Whisk in the vanilla extract and salt then whisk in the milk and flour mixture a spoonful at a time until it is all incorporated. Continue to mix until the buttercream is very smooth and fluffy.
Ganache:
-
Place the chocolate and cream in a bowl, microwave in short bursts, stirring regularly, until melted and smooth. Add food colouring a little at a time until it reaches a blood red shade. Set aside until cooled and thickened but still pourable.
Hearts:
-
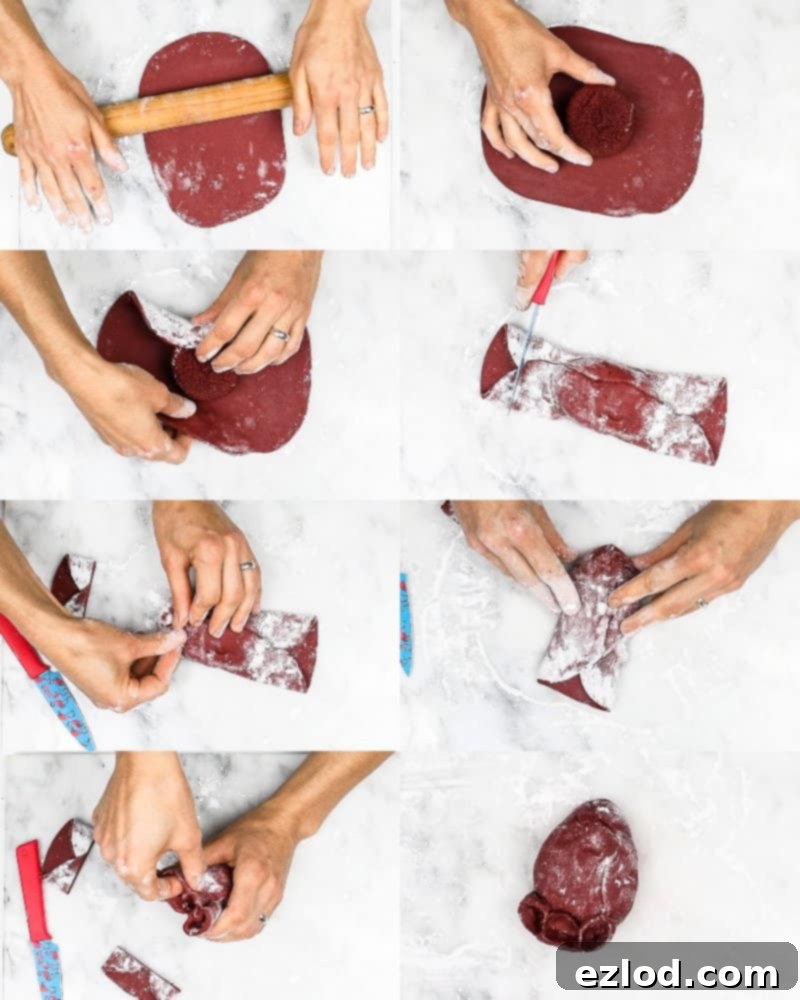
Knead a bit of black fondant into the red fondant to darken it. Break off a piece (about 125g worth) and roll into a ball. Sprinkle a work surface lightly with icing sugar. Roll out the fondant into a rough rectangle about 5mm thick.
-
Remove the liner from one of the cakes and place it in the middle of the rectangle, fold the two long ends over the cupcake to make a parcel. Fold in the bottom end and trim off the excess. Use your hands to mould it into a sort of heart shape, don’t worry too much about any creases or folds, they look great once the hearts have been painted with piping gel. Trim a bit of the excess fondant off the top and use your fingers to form three arteries. Watch the video I linked to above to get a better idea of the technique, it’s easier to watch than attempt to visualise the technique.
-
Repeat with the remaining cupcakes, you can re-use the fondant trimmings. Once the hearts are formed, use a soft paintbrush to brush them all over with the coloured piping gel, I brushed it on quite thickly so it looks like congealed blood.
Assembly:
-
Turn the cake out of its tin and peel off the parchment paper. Trim the top of the cake to level if needed (mine baked perfectly flat). Use a 8cm (3in) round straight sided pastry cutter to cut out as many circles of cake as you can, I got six.
-
Use a blob of buttercream to stick one cake round to a serving plate. Spread over a dollop more then place another cake round on top, upside down so that the top is perfectly flat. Carefully spread a thin layer of buttercream over the whole cake, it is quite soft so be gentle; I found the easiest way to do it was to hold the cake steady by placing two fingers on the top while I iced the sides, then gently spread buttercream over the top. It will be very full of crumbs, this is fine and exactly why crumb coats are important! Just make sure you don’t get any crumbs back in the bowl of buttercream.
-
Repeat these steps to make two more mini cakes then place them all in the freezer for about 15 minutes or so until firm.
-
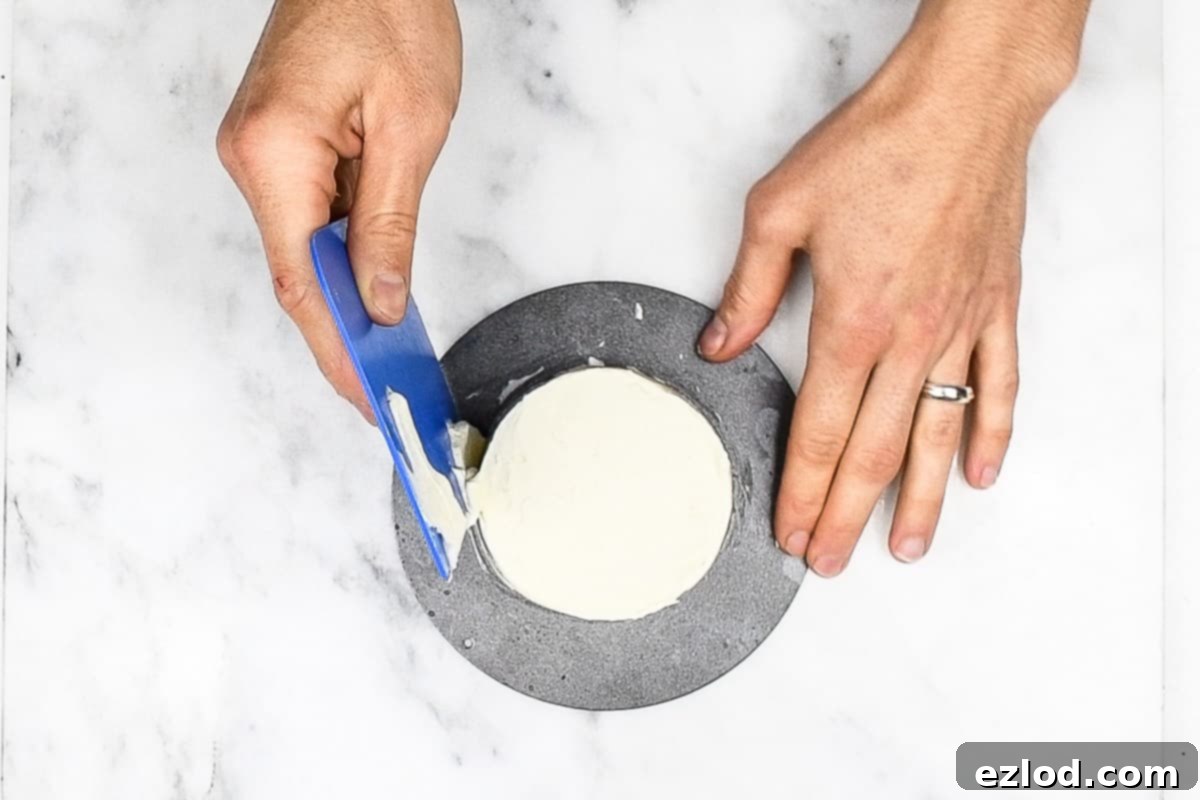
Spread another, thick layer of buttercream over each cake, using a dough scraper or pallet knife to get it smooth and even. It should be easier to spread this time as the cakes are firm. Once the cakes are smooth, return them to the freezer for another 15 minutes or so.
-
Remove the cakes from the freezer and drizzle some of the ganache over one side of each cake (if it has thickened too much you can give it a very short blast in the microwave to melt it a bit). Place a heart on top of each cake and serve.
Notes
- You will need a 23cm/9in square deep cake tin, a muffin tray, fairy cake/ small cupcake liners, an 8cm/3in round pastry cutter, red gel food colouring, black gel food colouring, red fondant, black fondant and a soft paintbrush.
- Makes three mini cakes and about seven hearts.
- Don’t paint the hearts or assemble the cakes until shortly before serving as the fondant will soak up the moisture and become soft.
- You can bake the cakes and make the piping gel a day or two in advance.
- Once assembled (but not painted with piping gel!) the hearts will keep in an airtight container for up to two days.
- The mini cakes cake be filled and coated with buttercream a day in advance and stored in the fridge.
- You will need food colouring in both red and black shades. I use Sugarflair.
- As for what to do with the cake scraps, they can be frozen for up to two months and used in a trifle or to make some Halloweeny cake pops.
- For the best results make sure that you follow the recipe closely. As always, I highly recommend using the gram measurements (with a digital scale), rather than the cup conversions. Cup measurements are simply not accurate enough for baking and I cannot guarantee the best results if you use them.
Mini Bleeding Heart Halloween Cakes Vegan Version:

Mini Bleeding Heart Halloween Cakes (Vegan Version)
Ingredients
Vegan Red Velvet Cake:
- 210 g non-dairy yogurt (I use soy)
- 100 ml non-dairy milk (I use soy)
- 2 tsp white wine or cider vinegar
- 2 tsp vanilla extract
- 350 g plain (all-purpose) flour
- 35 g cornflour (cornstarch)
- 20 g (2 Tbsp + 1 tsp) cocoa powder
- 1 tsp bicarbonate of soda (baking soda)
- ¾ tsp baking powder
- ½ tsp salt
- 150 g vegan block butter (NOT the spreadable kind. I use Naturli Vegan Block) softened
- 100 ml sunflower oil
- 350 g caster sugar
- red gel food colouring (about 1 tsp)
Piping Gel:
- 1 Tbsp cornflour (cornstarch)
- 60 ml (¼ cup) water
- 60 ml (¼ cup) lemon juice
- 70 g (⅓ cup) caster sugar
- red and black gel food colouring
Vegan Buttercream:
- 170 g vegan block butter (NOT the spreadable kind. I use Naturli Vegan Block) softened
- 65 g vegetable shortening (I use Trex)
- 300 g icing (powdered) sugar sifted
- 2 tsp cider vinegar
- 2 tsp lemon juice
- 1 tsp vanilla extract
Vegan Ganache:
- 60 g (2oz) dairy free white chocolate chopped
- 45 ml (3 Tbsp) coconut cream
- red and black gel food colouring
To Assemble:
- about 750 g (26oz) red fondant
- about 60 g (2oz) black fondant
Instructions
Vegan Red Velvet Cake:
-
Preheat the oven to 180°C/350°F/gas mark 4. Grease a 23cm/9inch square cake tin and line with baking parchment. Line a muffin tin with 6-7 cupcake cases.
-
Whisk together non the dairy-yogurt, non-dairy milk, vinegar and vanilla extract in a jug.
-
Sift together the plain flour, cornflour (cornstarch), cocoa powder, baking powder, bicarbonate of soda (baking soda) and salt.
-
In a large bowl, whisk together the softened vegan block butter, sunflower oil and caster sugar until it is light and fluffy.
-
Whisk in a third of the dry ingredients, then half of the wet ingredients, another third of the dry, the rest of the wet, then the rest of the dry.
-
Gently stir in red gel food colouring until the batter reaches the desired shade. Bear in mind that it will be darker once it is baked so make it a little lighter than you want it to end up.
-
Pour three quarters of the batter into the 23cm/9 inch square cake tin and spread it level. Divide the rest of the batter between the cupcake cases.
-
Bake the cakes until a skewer inserted into the centre comes out clean, about 20 minutes for the cupcakes and 30 minutes for the large cake.
-
Remove them from the oven and leave to cool in the tin.
Piping Gel:
-
Place the cornflour (cornstarch) in a saucepan and gradually stir in the water to make a smooth paste, add the lemon juice and caster sugar.
-
Whisk until smooth then place over a medium heat and whisk constantly until the mixture comes to the boil and thickens; it should go from being white coloured to almost translucent. Scrape into a bowl, cover and leave to cool.
-
Once cooled, add red gel food colouring, along with a teeny bit of black, a little at a time until the gel is a deep, dark blood-red colour. Store in an airtight container.
Vegan Buttercream:
-
Place vegetable shortening and softened vegan block butter in a bowl and whisk together with an electric mixer until smooth.
-
Add the sifted icing sugar, vinegar, lemon juice and vanilla extract and whisk on a high speed for a good few minutes until light and fluffy.
Vegan Ganache:
-
Place the dairy free white chocolate and coconut cream in a bowl, microwave in short bursts, stirring regularly, until melted and smooth.
-
Add food colouring a little at a time until it reaches a blood red shade. Set aside until cooled and thickened but still pourable.
Assembly:
-
Use an 8cm round cookie cutter to cut as many circles as you can out of the large red velvet cake. You need six circles to make three mini cakes.
-
Use a blob of buttercream to stick one cake round to a serving plate. Spread over a dollop more then place another cake round on top, upside down so that the top is perfectly flat.
-
Carefully spread a thin layer of buttercream over the whole cake, it is quite soft so be gentle; I found the easiest way to do it was to hold the cake steady by placing two fingers on the top while I iced the sides, then gently spread buttercream over the top.
-
It will be very full of crumbs, this is fine and exactly why crumb coats are important! Just make sure you don’t get any crumbs back in the bowl of buttercream. Repeat these steps to make two more mini cakes then place them all in the freezer for about 15 minutes or so until firm.
-
Spread another, thick layer of buttercream over each cake, using a dough scraper or pallet knife to get it smooth and even. It should be easier to spread this time as the cakes are firm. Once the cakes are smooth, return them to the freezer for another 15 minutes or so. (Or the fridge if you aren’t yet ready to assemble the cakes.)
-
To assemble the hearts, knead a bit of black fondant into the red fondant to darken it. Break off a piece (about 125g worth) and roll into a ball. Sprinkle a work surface lightly with icing sugar. Roll out the fondant into a rough rectangle about 5mm thick.
-
Remove the liner from one of the cupcakes and place it in the middle of the rectangle, fold the two long ends over the cupcake to make a parcel.
-
Trim off some of the excess fondant from one end of the parcel then fold it up. Use your hands to mould it into a sort of heart shape, don’t worry too much about any creases or folds, they look great once the hearts have been painted with piping gel.
-
Trim a bit of the excess fondant off the top and use your fingers to form three arteries.
-
Repeat with the remaining cupcakes, you can re-use the fondant trimmings. Once the hearts are formed, use a soft paintbrush to brush them all over with the coloured piping gel, I brushed it on quite thickly so it looks like congealed blood. (Don’t paint them until you are ready to assemble the cakes. The unpainted hearts can be stored in an airtight container for up to a couple of days but once they are painted they will start to soften a bit.)
-
Remove the cakes from the fridge or freezer and drizzle some of the ganache over one side of each cake (if it has thickened too much you can give it a very short blast in the microwave to melt it a bit). Place a heart on top of each cake and serve.
-
If the hearts don’t want to sit in place, use a toothpick to pin them to the cakes.
Notes
- You will need a 23cm/9in square deep cake tin, a muffin tray, fairy cake/ small cupcake liners, an 8cm/3in round pastry cutter, red gel food colouring, black gel food colouring, red fondant, black fondant and a soft paintbrush.
- Makes three mini cakes and about 6-7 hearts.
- Don’t paint the hearts or assemble the cakes until shortly before serving as the fondant will soak up the moisture and become soft.
- You can bake the cakes and make the piping gel a day or two in advance.
- Once assembled (but not painted with piping gel!) the hearts will keep in an airtight container for up to two days.
- The mini cakes cake be filled and coated with buttercream a day in advance and stored in the fridge.
- You will need food colouring in both red and black shades. I use Sugarflair.
- As for what to do with the cake scraps, they can be frozen for up to two months and used in a trifle or to make some Halloweeny cake pops.
- For the best results make sure that you follow the recipe closely. As always, I highly recommend using the gram measurements (with a digital scale), rather than the cup conversions. Cup measurements are simply not accurate enough for baking and I cannot guarantee the best results if you use them.
