Craft a Stunning Vegan Autumn Maple Leaf Cookie Wreath: Your Guide to an Edible Fall Centerpiece
Discover how to create an enchanting vegan Autumn leaf cookie wreath, a truly impressive and delicious centerpiece for any fall celebration. These exquisite cookies are infused with rich maple flavor and meticulously decorated with homemade vegan royal icing. This delightful project is proudly sponsored by Maple From Canada, bringing you the authentic taste of Canadian maple.

As the days grow shorter and the air turns crisp, there’s nothing quite like the warmth and aroma of autumn baking. This autumn leaf maple cookie wreath is more than just a dessert; it’s a captivating culinary project that culminates in a show-stopping edible centerpiece, perfect for Thanksgiving, Halloween gatherings, or simply celebrating the beauty of the colder months. While it requires a bit of time and patience, the process is incredibly rewarding, and the results are truly spectacular.
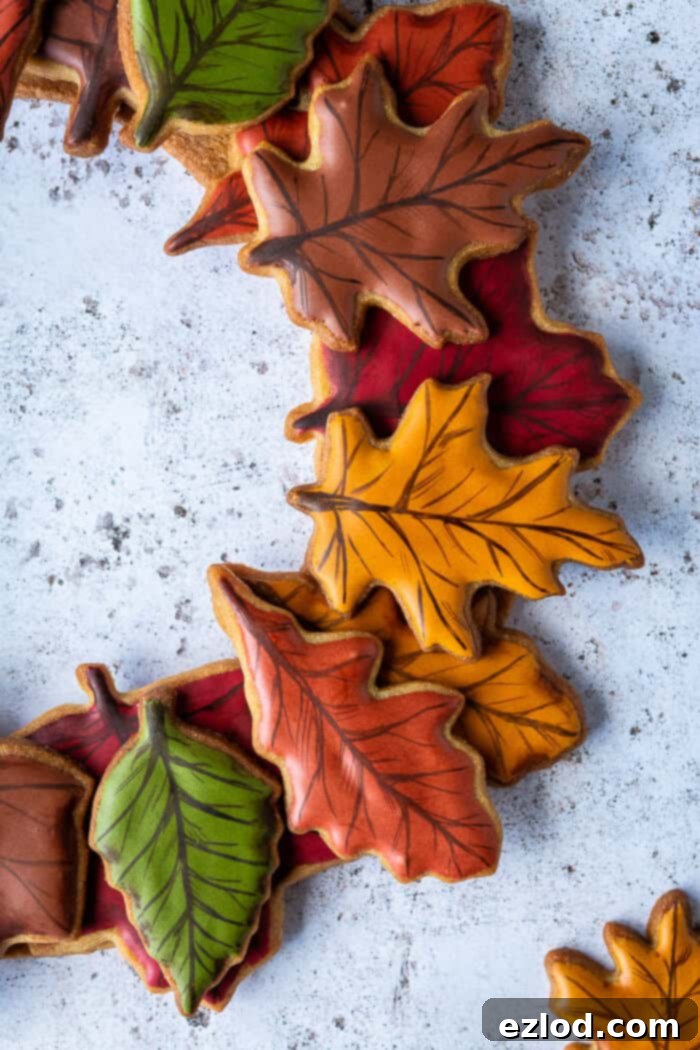
The wreath itself is a symphony of flavors and textures, consisting of delightful maple-infused biscuits, each shaped like a vibrant autumn leaf. These cookies are then transformed into miniature works of art, meticulously decorated with silky vegan royal icing in a palette of warm, earthy autumnal shades. To elevate their realism, I employed a subtle technique of painting on delicate leaf veins using watered-down gel food coloring once the icing had fully dried. This thoughtful detail brings each cookie to life, making them almost too beautiful to eat.
Once decorated, these individual leaf cookies are carefully adhered to a larger, sturdy ring-shaped biscuit using more royal icing, forming a cohesive and striking wreath. This construction not only makes for an impressive display but also ensures structural integrity. Of course, if time is a constraint or you prefer simplicity, you can certainly enjoy the maple cookies on their own without any elaborate decoration; their rich flavor makes them utterly delicious even in their simplest form. In fact, this recipe yields more cookies than you’ll need for assembly, providing plenty of extra treats for snacking and sharing.
The secret to the unparalleled flavor of these cookies lies in the quality of the maple syrup. I exclusively used pure Canadian maple syrup, which imbues the biscuits with a depth of flavor that genuinely sets them apart from conventional cookies. Its natural sweetness and distinct caramelized notes elevate these treats from a simple biscuit to a gourmet delight, making every bite a celebration of autumn.

The Magic of Vegan Royal Icing
Achieving that crisp, smooth, and vibrant finish on your cookies is all thanks to royal icing. And for those following a plant-based diet, fear not – vegan royal icing is surprisingly simple to create. The star ingredient here is aquafaba, the versatile liquid drained from a can of chickpeas, which beautifully mimics the properties of egg whites. This remarkable substitute whips up into stiff, glossy peaks, forming the perfect base for your cookie decorations.
The preparation mirrors traditional royal icing: simply whisk the aquafaba and icing sugar together until you reach a firm, lustrous consistency. For an added layer of flavor that complements the maple cookies, I like to incorporate a touch of maple syrup directly into the icing. This step is entirely optional but highly recommended for a truly cohesive taste experience. Once prepared, this robust icing provides a pristine canvas for your autumnal artistry.
Essential Equipment for Your Maple Cookie Wreath
To embark on this delightful baking adventure and successfully create your stunning maple cookie wreath, gathering the right tools is key. Here’s a list of the equipment you will need:
- Leaf-Shaped Cookie Cutters: A set of varying leaf shapes will give your wreath a natural, organic look. Ensure your cutters are approximately 3 inches in size; smaller cutters are generally better suited for delicate sugar work rather than sturdy cookies. These allow for good detail and are easy to handle and decorate. You can find suitable sets on Amazon or at most baking supply stores.
- Gel Food Coloring: Essential for achieving vibrant, concentrated colors without altering the icing’s consistency. You’ll need a selection of autumnal shades including red, yellow, green, chestnut brown, and dark brown. Gel colors are superior to liquid ones as they provide intense pigment with minimal moisture.
- Fine Paintbrushes: A couple of clean, fine-tipped paintbrushes will be indispensable for adding intricate details like leaf veins once the royal icing has dried. Dedicate these brushes solely to food use for hygiene.
- Electric Mixer: This tool is a lifesaver for creaming butter and sugar, and crucial for whipping aquafaba into the necessary stiff peaks for your royal icing. Both a stand mixer and a hand-held electric mixer will work perfectly.
- Standard Baking Supplies: This includes essential items like large mixing bowls, sturdy baking sheets, baking parchment (for non-stick baking and easy dough handling), a rolling pin (preferably an adjustable one for even thickness), and a digital kitchen scale for accurate measurements.

Detailed Steps: How To Make Your Maple Cookie Wreath
(For specific ingredient quantities and comprehensive instructions, please refer to the complete recipe card below. Always prioritize gram measurements with a digital scale for the most consistent and accurate baking results, as cup conversions can be less precise.)
For the most enjoyable and stress-free baking experience, it is highly recommended to spread the creation of this wreath over two days. This allows ample chilling and drying time, breaking the project into manageable stages. While completing it in a single day is possible, it will be a significant undertaking.
Day 1: Preparing and Baking the Cookies
Step 1: Crafting the Maple Cookie Dough.
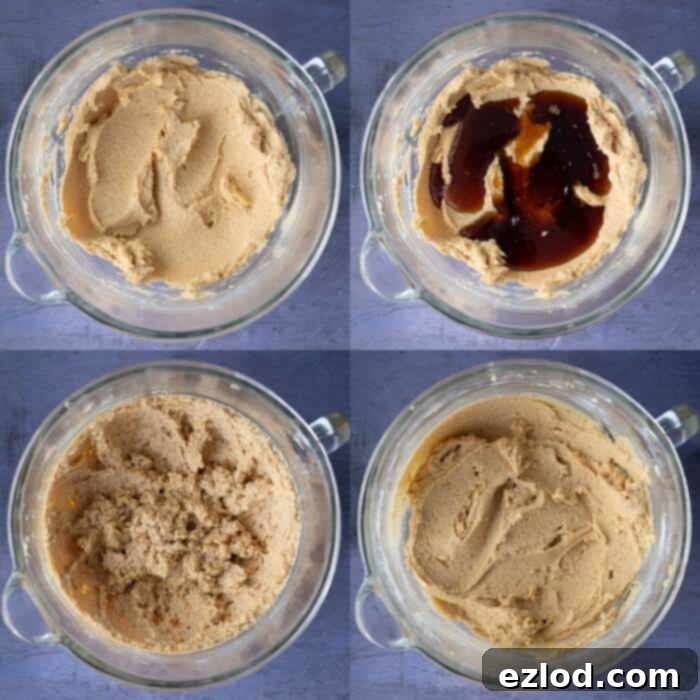
Begin by preparing your rich maple cookie dough. In a large mixing bowl, combine the softened vegan block butter (ensuring it’s at room temperature for optimal creaming) and the light brown soft sugar. If you choose to incorporate maple sugar for an even deeper maple flavor, add it at this stage as well. Using an electric mixer, beat these ingredients together for several minutes until the mixture becomes wonderfully fluffy and light in color, indicating it’s well combined and aerated.
Next, whisk in the pure maple syrup, followed by the salt and baking powder. Don’t be alarmed if the mixture appears slightly curdled at this point; this is a normal reaction and will not affect the final texture of your cookies.
Finally, gradually add the plain (all-purpose) flour, stirring gently until a soft, pliable dough forms. Divide this dough into two equal portions, shaping each into a flat disc. Wrap each disc tightly in plastic wrap and refrigerate for a minimum of two hours, or until the dough is sufficiently firm to handle and roll without sticking. Proper chilling is crucial for preventing spread during baking and ensuring crisp cookies.
Step 2: Shaping and Baking the Wreath Ring.
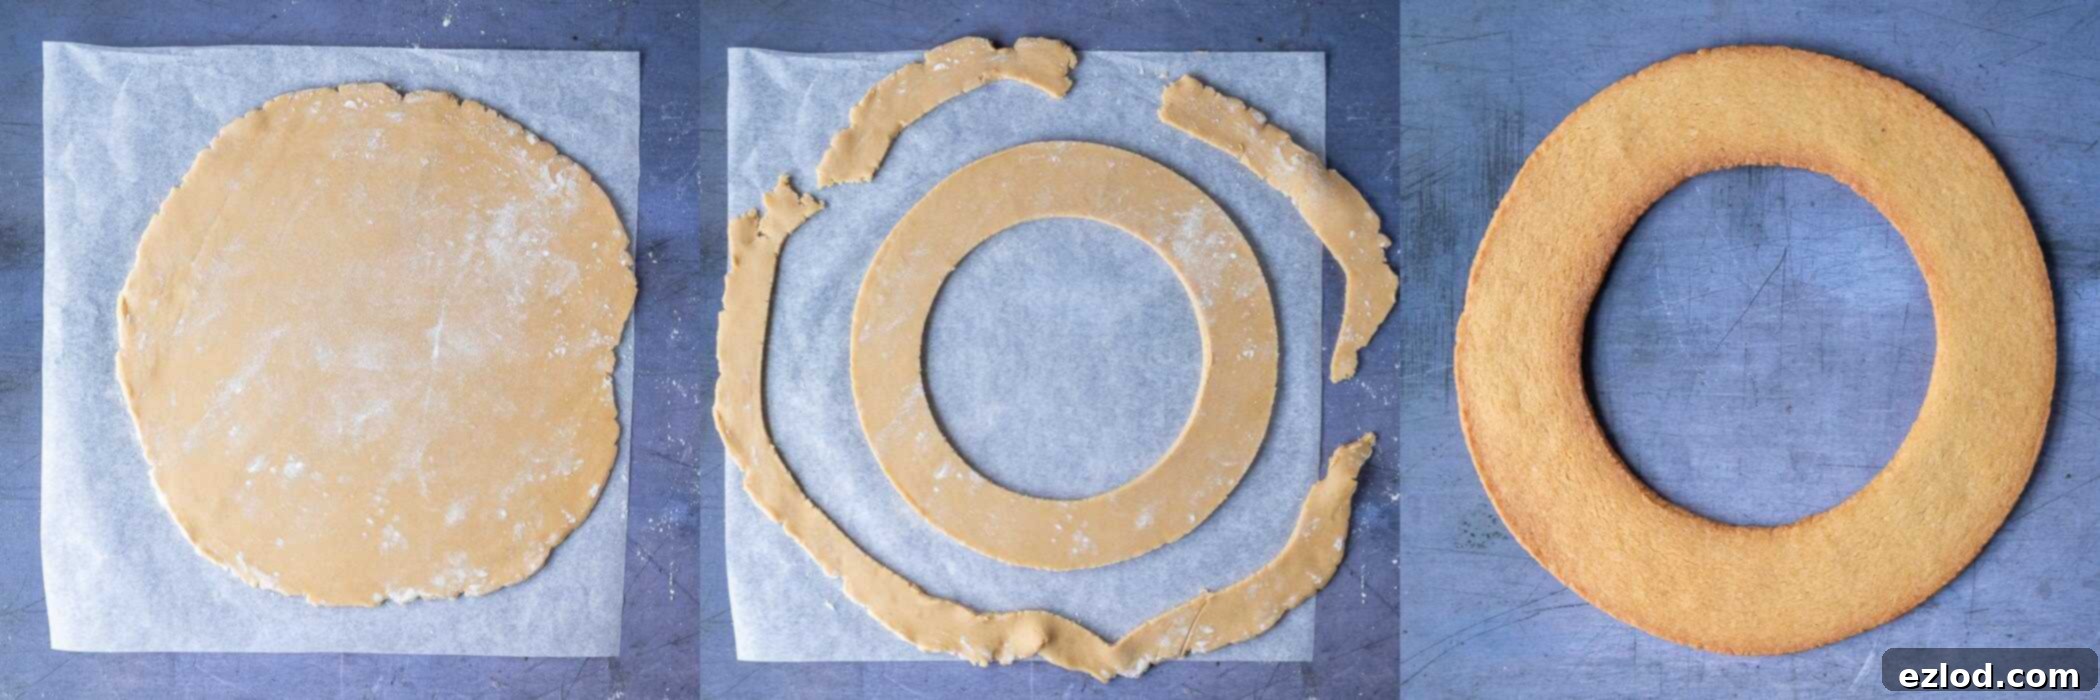
Once your dough is thoroughly chilled and firm, it’s time to create the base of your wreath. Lightly dust a sheet of baking parchment with flour, then place one of the chilled dough discs on it. Dust the top of the dough with a little more flour and, using a rolling pin, roll it out evenly to a thickness of approximately 3mm (or 1/8 inch). Aim for a consistent thickness across the entire circle to ensure even baking.
For the large outer circle of the wreath, use the base of an approximately 28cm (11-inch) round cake tin or a large dinner plate as a guide to cut out a perfect circle. Then, using a smaller guide, about 18cm (7 inches) in diameter, cut out a smaller circle from the center of the larger one. This will leave you with a beautifully formed large ring, which will serve as the foundation for your autumn leaf cookies.
Carefully slide the baking parchment with the cookie ring onto a baking sheet. Place it in the freezer for about 15 minutes (or the refrigerator for 30 minutes) while your oven preheats. This quick chill further helps the cookie maintain its shape during baking. Bake the ring for approximately 20 minutes in a preheated oven (180°C/350°F/gas mark 4), or until it turns a lovely golden brown. Allow it to cool slightly on the baking sheet before transferring to a wire rack to cool completely.
Step 3: Cutting and Baking the Leaf Cookies.
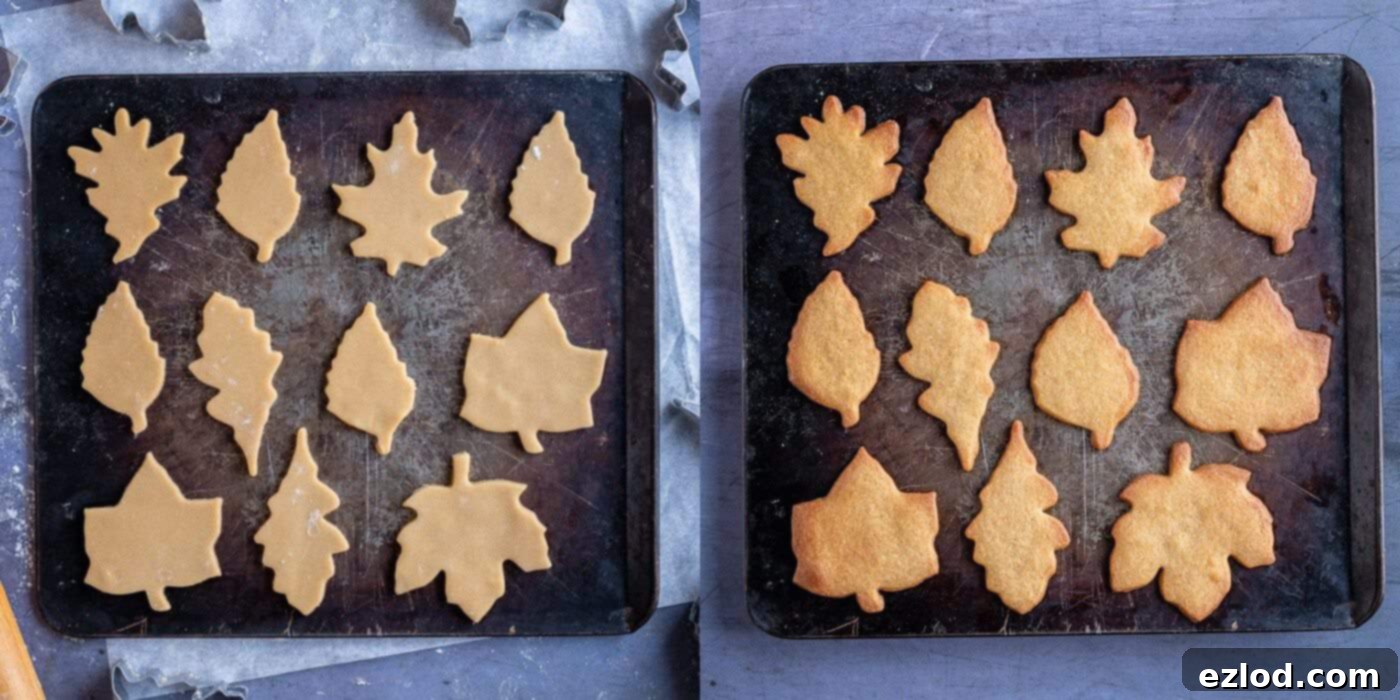
While the large ring cookie bakes, retrieve the second disc of chilled dough. Roll it out on another floured sheet of baking parchment to the same 3mm (1/8 inch) thickness. Using your chosen leaf-shaped cookie cutters, cut out an assortment of individual leaf cookies. Arrange these leaf shapes on a couple of baking sheets lined with baking parchment, ensuring they are spaced adequately apart to prevent them from merging during baking. Just like the ring, pop these trays into the freezer for 15 minutes to firm up.
Bake the chilled leaf cookies for about 10-12 minutes, or until their edges turn a light golden color. The exact baking time may vary slightly depending on your oven and the size of your cookies. Once baked, let them cool on the trays for a few minutes before carefully transferring them to a wire rack to cool completely. Gather any dough scraps, gently knead them back together, and re-chill if too soft, then roll out and cut more leaf shapes until all the dough is used. Store all cooled cookies in an airtight container, ideally overnight, before proceeding to the decoration stage.
Day 2: Decorating and Assembling the Wreath
Step 4: Preparing the Vegan Royal Icing.
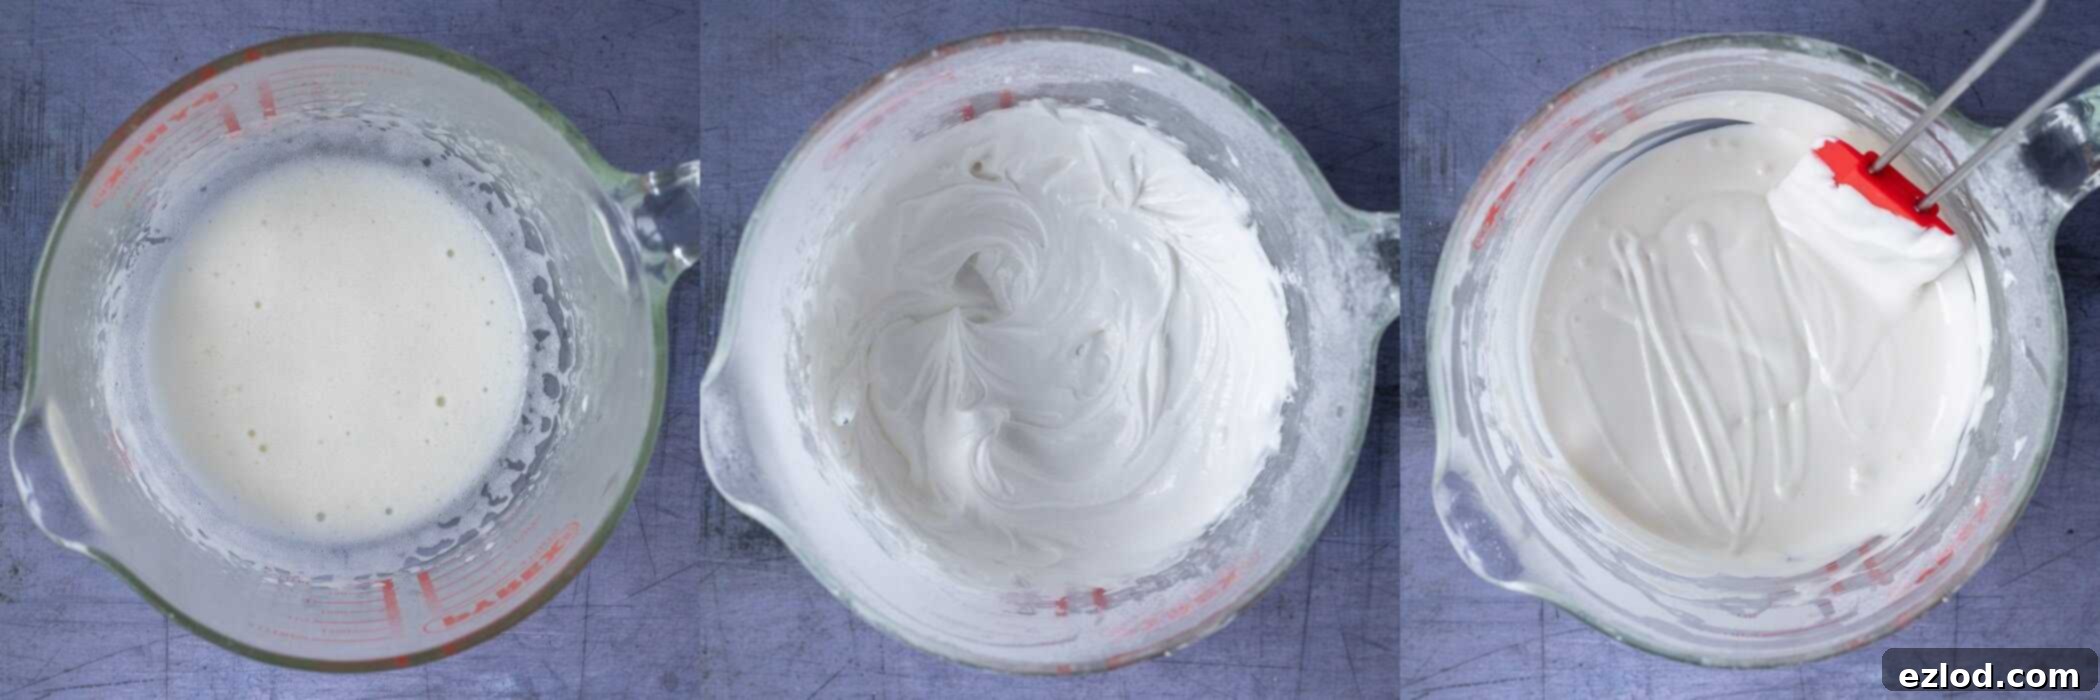
With your beautiful maple cookies cooled and ready, the next step is to create the vegan royal icing. Ensure you use a scrupulously clean, dry bowl – any trace of grease can prevent the aquafaba from whipping effectively. Pour the aquafaba into the bowl and whisk it with an electric mixer until it becomes frothy and slightly aerated.
Gradually sift in the icing (powdered) sugar, then continue whisking with the electric mixer for approximately 5 minutes. The mixture should become very thick and glossy, forming soft peaks when you lift the beaters. A good indicator of readiness is when a peak forms but gently droops rather than standing rigid.
Next, whisk in the maple syrup for that extra layer of flavor. Then, carefully stir in lemon juice, adding it ½ teaspoon at a time, until the icing reaches a thick, yet pourable consistency. To test, drizzle some icing back into the bowl; if the pattern disappears after about 8 seconds, the consistency is perfect for flooding. If it becomes too runny, a little more icing sugar can be whisked in to thicken it. Conversely, if it’s too stiff, a tiny drop more lemon juice can help.
Step 5: Coloring the Icing for Autumnal Hues.
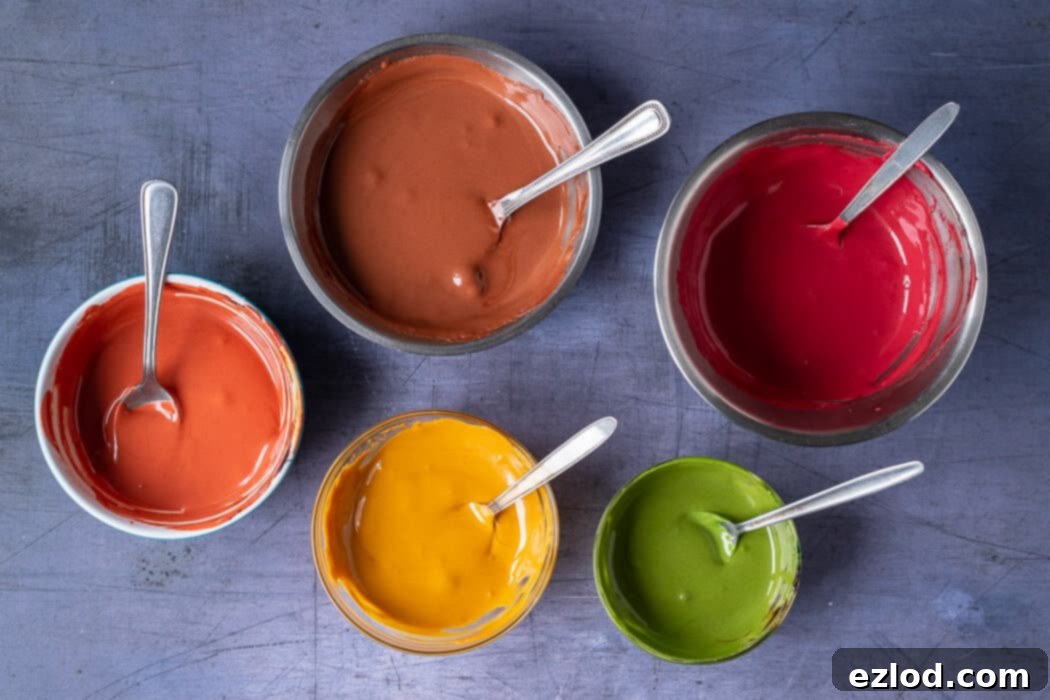
Divide your freshly made royal icing into five small bowls. Using gel food coloring (which won’t thin your icing like liquid colors), color each bowl as follows: one red, one yellow, one orange (achieved by combining red and yellow coloring), one green, and one chestnut brown. For a more authentic, muted autumn leaf effect, add a tiny touch of chestnut brown coloring to each of the already colored bowls. This subtle addition will make the colors appear more natural and less artificially bright, mimicking the rich diversity of fall foliage.
Step 6: Icing the Leaf Cookies.
Prepare your oven by setting it to its absolute lowest temperature (around 60°C/140°F) or simply heating it briefly and then turning it off (residual heat works well, or you can air dry them). Take a teaspoon and carefully spread a thin, even layer of one colored icing over the top of each leaf biscuit, varying the colors to create an attractive mix. Use the edge of the spoon to gently nudge the icing towards the perimeter of the biscuit, aiming for a clean, defined line without letting the icing spill over the edge. The correct icing consistency will allow you to spread it smoothly, and the surface should self-level after a few seconds without running off the cookie.
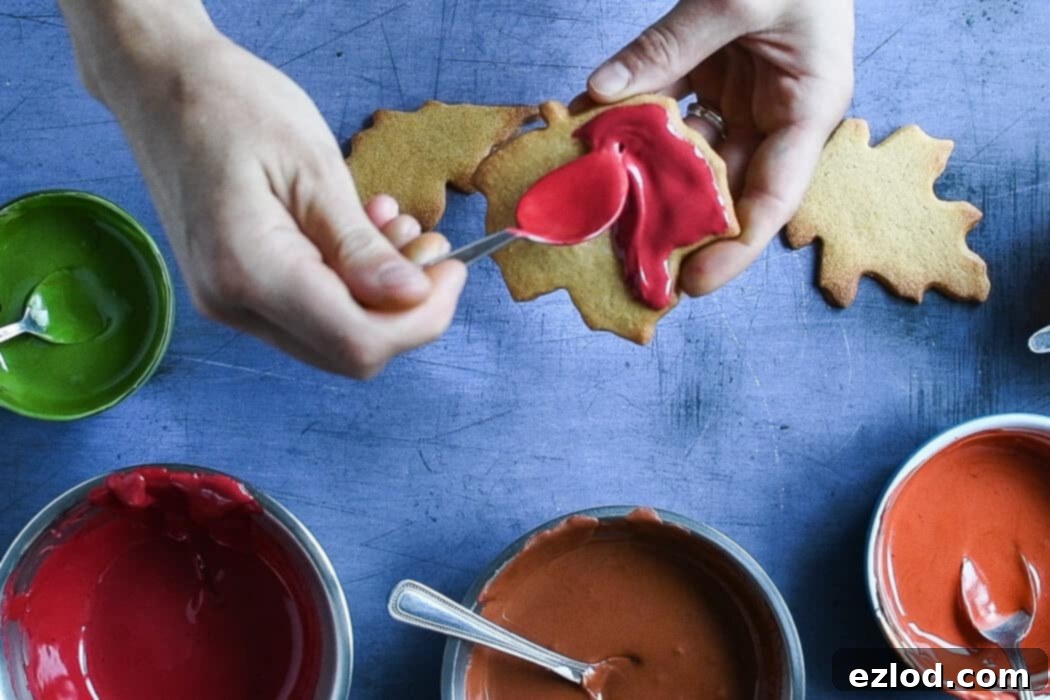
Place the iced biscuits on baking sheets and set them in the very low oven for about 30 minutes, or until the icing is completely dry to the touch. Alternatively, you can air dry them at room temperature, though this will take considerably longer (typically 3-4 hours). While the cookies are drying, make sure to cover any leftover royal icing tightly to prevent it from drying out. You’ll need it for assembly!
Step 7: Adding Artistic Leaf Veins and Shading.
Once the royal icing on your leaf cookies is perfectly dry, it’s time to add those realistic details. In three separate small bowls, place about ½ teaspoon of gel food coloring – one dark brown, one chestnut brown, and one red. Stir approximately a teaspoon of water into each, just enough to thin them to a paint-like consistency. Using your fine paintbrush, carefully paint delicate veins onto each leaf with the dark brown mixture. Then, use the chestnut and red “paints” to add subtle shading, depth, and unique details to your leaves, mimicking the natural variations found in autumn foliage. This step allows for a lot of creative freedom! Set the painted cookies aside to dry completely.

Step 8: Assembling Your Autumn Leaf Cookie Wreath.
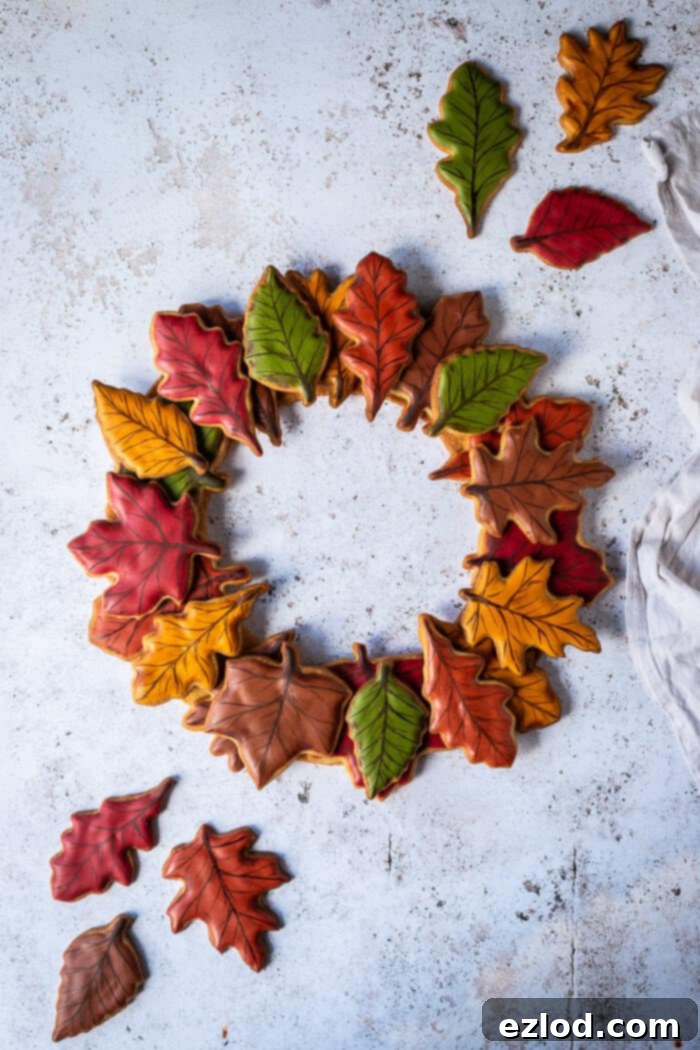
With all your leaf cookies beautifully decorated and dry, it’s time for the grand assembly! Take your large ring biscuit base. Use small “blobs” of the leftover royal icing as an adhesive to carefully attach the decorated leaf cookies to the biscuit ring. Begin by arranging them in a foundational circle around the ring, slightly overlapping them for a fuller effect. Then, add a second layer of leaves on top, staggering them for dimension and visual interest. Remember, you won’t need all the cookies you made, so select the best ones for your wreath. Once assembled, set the entire wreath aside for a couple of hours to allow the royal icing to fully set and secure the leaves in place before serving or storing.
Top Tips for a Perfect Maple Cookie Wreath
- Plan Ahead: This project is best tackled over two days. Dedicate the first day to making the dough, chilling, and baking the cookies. The second day can then be focused on the enjoyable decoration and assembly. This approach makes the process much more relaxed and ensures sufficient drying time for the icing.
- Chill Your Dough: The maple cookie dough is intentionally soft for optimal flavor and texture. Ensure you chill it for at least a couple of hours, or until it’s very firm. This crucial step prevents the cookies from spreading too much in the oven, helping them maintain their intricate leaf shapes.
- Freeze Before Baking: For extra crispness and to further guarantee the cookies hold their shape, freeze them for 15-20 minutes just before baking. If you’re short on freezer space, refrigerating for 30 minutes is a good alternative.
- Choose the Right Vegan Butter: For the cookie dough, it is imperative to use a solid block vegan butter (e.g., Naturli vegan block, Stork block, Vitalite, Tormor block, or Earth Balance buttery sticks). Avoid spreadable vegan margarines from tubs, as their higher water content can negatively impact the cookie’s texture and lead to excessive spreading.
- Aquafaba Power: For your vegan royal icing, simply use the liquid drained from a can of chickpeas. It whips up beautifully, providing the stability and gloss needed for stunning decorations.
- Gel Food Coloring is Key: Always opt for gel-based food coloring over liquid varieties when coloring royal icing. Gels are highly concentrated and won’t thin out your carefully prepared icing. Sugarflair colors are a popular and reliable vegan-friendly brand.
- Cookie Cutter Size Matters: Double-check that your leaf cookie cutters are at least 3 inches in size. Smaller cutters often result in cookies that are too fiddly to decorate effectively and may bake inconsistently.
- Storage and Longevity: Once fully assembled and dried, your beautiful maple cookie wreath will remain fresh and impressive for approximately one week. Store it in an airtight container to best preserve its freshness. Be aware that over time, the cookies may soften slightly. Any extra, undecorated maple cookies can also be stored in an airtight container and enjoyed for several days.

If you tried this delightful recipe, we’d love to see your creations! Tag @domestic_gothess on Instagram and use the hashtag #domesticgothess to share your autumn leaf maple cookie wreath.
*All images and content on Domestic Gothess are copyright protected. If you wish to share this recipe, please do so by using the provided share buttons. Do not screenshot or post the recipe or content in full.*

Print
Autumn Leaf Maple Cookie Wreath
Ingredients
Maple Cookies:
- 300 g (1 ¼ cups) vegan block butter softened
- 250 g (1 ⅓ cups) light brown soft sugar
- 150 ml (½ cup + 2 Tbsp) maple syrup
- ¾ tsp salt
- ½ tsp baking powder
- 500 g (4 cups) plain (all-purpose) flour
Vegan Royal Icing:
- 45 g (scant 3 Tbsp) aquafaba
- 275 g (2 ¼ cups) icing (powdered) sugar
- 2 tsp maple syrup
- juice of ½ lemon
- gel food colouring in red, yellow, green, chestnut brown and dark brown
Instructions
-
Ideally, begin this recipe the day before you plan to assemble the wreath. To make the maple cookie dough, place the softened vegan block butter and the light brown soft sugar (and maple sugar if using) in a large bowl. Whisk with an electric mixer for several minutes until the mixture is fluffy and well combined.
-
Next, whisk in the maple syrup, followed by the salt and baking powder. Don’t worry if the mixture appears slightly curdled at this stage; it’s completely normal and will not affect the final cookie quality.
-
Add the plain flour and gently fold it in until the mixture comes together to form a soft dough. Divide the dough into two equal portions, shape each into a disc, wrap them securely, and place them in the fridge for at least a couple of hours, or until the dough is firm enough to roll out.
-
Once the dough is firm, dust a sheet of baking parchment with flour and place one of the dough discs on top (keep the other disc refrigerated). Dust with more flour and roll out the dough to an even thickness of about 3mm (1/8 inch).
-
Use the base of an approximately 28cm/11-inch round cake tin or dinner plate to cut out a large circle. Then, use an approximately 18cm/7-inch guide to cut a smaller circle from the center, creating a large cookie ring.
-
Carefully slide the baking parchment with the cookie ring onto a baking sheet. Place it in the freezer for 15 minutes while you preheat your oven to 180°C/350°F/gas mark 4.
-
Bake the cookie ring for about 20 minutes, or until it is beautifully golden brown. Remove it from the oven and let it cool on the baking sheet for 5 minutes before carefully sliding the parchment onto a wire rack to cool completely.
-
While the ring is baking, retrieve the second dough disc. Roll it out as described above and cut out various leaf shapes using your cookie cutters. Arrange them spaced apart on baking sheets lined with parchment and place in the freezer for 15 minutes.
-
Bake the chilled leaf cookies for approximately 10-12 minutes, or until they are golden around the edges. Allow them to cool on the trays for 5 minutes, then transfer to a wire rack to cool completely.
-
Gather any dough scraps, gently bring them together, and re-roll to cut out more leaf shapes. If the dough becomes too soft, wrap it and chill it again for an hour. Chill and bake these additional cookies following the same steps.
-
Once all cookies have cooled completely (I often place them in an airtight container overnight), proceed to make the royal icing.
-
Place the aquafaba in a clean, dry bowl and whisk with an electric mixer until it is light and frothy. Sift in the icing sugar and continue whisking for about 5 minutes until the mixture is very thick and glossy, forming soft peaks.
-
Whisk in the maple syrup, then gradually stir in the lemon juice, ½ tsp at a time, until the icing achieves a thick but pourable consistency. To test, drizzle some icing back into the bowl; the pattern should disappear after approximately 8 seconds. If it becomes too runny, whisk in a little more icing sugar to thicken it.
-
Divide the prepared royal icing into 5 small bowls. Use gel food coloring to tint one red, one yellow, one orange (by combining red and yellow coloring), one green, and one chestnut brown. To achieve more realistic autumn leaf colors, add a small amount of chestnut brown coloring to each of the already colored bowls.
-
Preheat your oven to its absolute lowest setting (around 60°C/140°F) or simply use the residual heat from a recently turned-off oven. This helps the icing dry faster and achieve a smooth finish.
-
Using a teaspoon, carefully spread some of the colored icing over the top of each leaf biscuit, creating a variety of colors. Use the edge of the spoon to gently guide the icing towards the biscuit’s edge, ensuring a clean line without pushing it over.
-
If your icing consistency is correct, you should be able to spread it smoothly and neatly with the spoon, and the top surface will self-level after a few seconds, but it will not run off the cookie.
-
Place the iced biscuits on a couple of baking sheets and dry them in the low oven for approximately 30 minutes, or until the icing is completely dry to the touch. Remember to cover any leftover royal icing tightly to prevent it from drying out.
-
Once the icing has dried, prepare your “paint” for the details. Place about ½ tsp of dark brown, chestnut brown, and red gel food coloring into separate small bowls. Stir about a teaspoon of water into each to thin them. Use a fine paintbrush to paint intricate veins onto each leaf with the dark brown. Then, use the chestnut and red to add shading and additional detail as desired. Set aside to dry completely.
-
Finally, once the painted details are dry, use small blobs of the leftover royal icing to attach the decorated leaves to the large biscuit ring. Arrange them artfully in a circular pattern, then add additional leaves on top to create a lush, layered effect. You won’t need all the leaves you’ve made, so select the most beautiful ones. Allow the assembled wreath to set for a couple of hours until the icing adhesive is firm before serving. Store any remaining cookies in an airtight container.
Notes
For a more relaxed and enjoyable experience, it is highly recommended to make this maple cookie wreath over the course of two days. I typically prepare the dough and bake all the cookies on the first day, allowing them to cool thoroughly (often overnight). The second day is then dedicated to the more intricate process of icing, painting the biscuits, and finally assembling the stunning wreath. This allows for proper drying times and reduces stress.
This post is proudly sponsored by Maple From Canada. Your support for brands like theirs allows me to continue sharing my passion for baking, experimenting with delicious recipes, and creating a delightful mess in my kitchen! Thank you for being a part of this culinary journey.
